Thursday, November 19, 2020

Of Heralds and Paint Schemes

It all started innocently enough. There is a group of us that are interested in coal hauling railroads and we trade emails back in forth. The topic of Alco RS3s on the L&N came up and there were a number of great photos posted. I made the comment that I just might add a couple of RS3s to the roster for a mine run. And that was the start of an amazing deep dive into the railroad's locomotive history and some beautiful first generation diesel paint schemes.

Before I go any further, let me introduce Dan Borque. As I'm sure many of you know, he is the owner and proprietor of the Appalachian Railroad Modeling website and you can find it here:  https://appalachianrailroadmodeling.com/. If you haven't checked out this site, you need to- it's filled with beautiful models, great prototype information and stories, and more track plans than you will ever find in one place. Dan is one of the most prolific track planners in model railroading and his plans have been featured in many publications. He is also an incredibly skilled modeler who is currently working on the St. Charles Branch of the Southern Railway. Here's a link to the website: https://appalachianrailroadmodeling.com/stcharlesbranch/

So shortly after the comment about the RS3s, Dan mentioned that it might be neat to do an "an Alco-designed lacquer scheme with lots of curves and stripes and a more practical grey and yellow for repaints." The next thing I know, there's a great looking picture of an RS3 in the proposed as-delivered paint scheme. After some input from the group and some back and forth between the two of us, Dan came up with what you see below.


Dan found some beautiful locomotive line drawings that are the work of Will Anderson. With a little bit of manipulation, he was able to add color to the drawings. Note that he also added credits at the bottom of the print.

In short order, Dan was working on the original scheme for the F units, the GPs, and a herald. Somewhere in all of this I provided him with the first diesel roster that I had developed when I originally planned the railroad along with a much later version. Dan then asked if I had ever done an analysis of total horsepower versus number of units over the years. This led to a deep dive into the roster- models, years acquired, numbers, horsepower, retirements, paint schemes- for the period from initial dieselization through August, 1976. The Excel spreadsheet that Dan prepared with all of this information is simply amazing.

There is much more to come on all of this. And I still can't believe I was fortune enough to have someone with Dan's talent pull all of this information together and develop such great looking paint schemes. But for now, I'll leave you with the steam era herald that Dan developed.


Friday, November 13, 2020

"Cause there's a fat man..."

No, not in the bathtub, but in the railroad room. During a recent op session, there were several instances of turnouts being thrown inadvertently. From all available evidence, it appears these were the result of a crew member bumping up against one of the pushbuttons on the panels. It one instance, it caused a massive derailment of a westbound MT coal train. And in fact, one crew member wrote up an occurrence, stating that he had actually observed a protruding belly commit one of these infractions.

The unnamed crew member who observed the pushbutton faux pas suggested a possible solution to the problem. His idea was to make clear cover with finger holes for the pushbuttons. I had some leftover Lexan clear plastic from a previous project, so I got to work.

The first step was to print out a copy of the panel to use as a template. I then measured the distance from the top of the pushbutton to the panel, substracted the width of the Lexan, and made stand-offs from Evergreen styrene tubing. Add some nuts and bolts and you have what you see below.


A close-up view of the Panel Protector (patent pending) shows the distance between the cover and the top of the pushbuttons.


I need one more of these for the panel at Summit Springs. Crews working the mines there need to lean in a bit to reach the cars and it would be easy to bump one of the pushbuttons while working a cut of cars. 

Now I just have to hope that the fingers of the fa.. er, waist challenged crew members will fit through the holes in the covers!

Monday, November 9, 2020

Track Plan

The CWE was featured in the June 2016 issue of Railroad Model Craftsman and the article included a beautiful track plan drawn by then editor Stephen Priest. I recently received permission from Otto Vondrak, the current editor of RMC, to post the plan on the blog with proper accreditation.  So here it is!


©2016-2020 White River Productions, illustration by Stephen Priest. Used with permission.

This plan is the result of Stephen's amazing talent and interest in the railroad, and I'm grateful to him and the folks at White River Productions for taking the time to make this happen.


Saturday, October 3, 2020

Introducing... Hardy Coal Sales!

Some time ago, Anthony Hardy sent around a photo of a unique operation in the CSX yard at Ravenna, KY. Here's the photo along with his description:


Basically though what the operation consisted of was an old backhoe that permanently sat on an flatbed truck with no doors and beat up dump truck. And of course a siding.

CSX had a weigh in motion scale at Pryse about 4-5 miles from Ravenna yard. Sometimes they'd catch a car that was overloaded. Not every train...but somewhat a common occurrence. Just like a bad order, those cars had to be set out and corrected before they could continue.

Yard crew would work the train to pull the overloads, then set them out on the siding, which of course the crews referred to as "the overload track".

A local contractor, last name was Ballard, used the rear scoop from the backhoe to pull enough coal from the car to bring it into compliance. The coal was put in the old dump truck, then dumped on site. The dump truck was not used on the road, just onsite. There wasn't even a windshield in the dump truck.

My understanding is that the contractor was given the coal in exchange for making the car 'legal'. After enough was collected, they would sell the coal, bring in a tractor trailer truck, and bring a front end loader, and load out 2-3 truckloads of coal. I don't know who they sold it to...probably spot market stuff. I never saw them load it back into hopper cars, but that would be definitely plausible for shipment.

I also did see one time a centerbeam flat car loaded with fabricated i-beam floor joists spotted there. I don't know if the car was overloaded or if it got set out for some other reason but I can see where any heavy bulk load 'could' be overloaded. That was the only time I ever saw anything besides a coal hopper spotted there.

The other interesting thing was when the cars were lightened, many times they were part of a privately owned unit train. However, they would not get tied back on to that train next time it came through. It normally would leave via the one regular mixed freight that originated at Ravenna. So you'd see one or two aluminum rapid discharge cars leaving on a mixed freight.

It was a neat little operation for sure!


Of course, something like this just screams to be modeled, and I had planned on doing just that. The biggest challenge was finding the right backhoe and truck for my 1976 era. I spent some time searching the Internet but was unable to find anything that would work. Then Anthony came to my rescue with a picture of a backhoe made by GHQ Models and a link to their website. While the company is primarily a manufacturer of wargame models, they have a very nice line of HO scale kits of construction and farming equipment. Here's a link to the website: https://www.ghqmodels.com/ . I promptly ordered the backhoe kit and the project was on!

For the truck, I have a collection of old Roco military models that belonged to my father. One of the deuce and a half trucks seemed to be the perfect candidate as you could often find those in all types of service after they were sold by the military. Several modifications were made to the truck. The front axle was moved forward slightly in order to more closely match the prototype appearance and the sides of the bed were cut back to accommodate the outriggers. 

Modifications to the backhoe included removing the arms for the front bucket. As can be seen in Anthony's photo, the bucket has been removed and the front wheels have been turned in order to get the backhoe as far forward in the truck bed as possible. The photo below shows the truck and backhoe after being painted.


Next, the equipment was weathered using artist's oils and turpenoid. The pieces above were weathered separately as I wanted to make sure I could get into areas that might be blocked or difficult to reach once the vehicles were assembled. The photo below shows the results.


Finding a location for the operation was the easy part. There was an area of North Pierce that had never been finished because I couldn't decide what to do with it. One idea was to add an old boxcar as a storage shed. I also considered adding another building of some sort. And I was never really happy with the way the scenery around the truck loader turned out. There just wasn't enough coal on the ground around the structure and the tracks. The photo below shows how the area looked.


This area would be perfect- enough room for the equipment and coal on the ground and a place to spot a loaded hopper on the spur to the tipple. So the next step was to redo the scenery in the area. I used a combination of different colored grouts and real coal for the ground cover. The photo below shows the completed scene.


And here's a closeup of the truck and backhoe. Note that the outriggers have been added to keep the whole mess from tipping over!


Of course, there has to be some kind of paperwork for the crews alerting them to the overweight cars. Using the template I have for waybills, I made up some "OVERWEIGHT" inserts that can be slipped into the plastic waybill sleeve. The photo below shows a typical coal waybill along with one that has been marked as overweight. Note that it includes where the car should be set out along the line and the location at North Pierce with the TIBS alpha numeric code (Hardy Coal Sales N16). Crews will now need to be on the lookout for Overweight cars in addition to Bad Order cars


The photo below shows the MT's spotted at the tipple and the first loaded hopper ready to be relieved of some coal.


As for the name of the operation, it seemed only appropriate to call it Hardy Coal Sales. After all, it would never have happened without Anthony's photo, background info and help in finding a suitable backhoe. And if you know Anthony, then you know he has a wonderful sense of humor. When he originally passed around the email, he titled it "Ballard's Coal Scooper Outer." So this operation, while formally named Hardy Coal Sales, will most likely be referred to by the crews as the Scooper Outer!

Monday, September 21, 2020

Bunk House Update

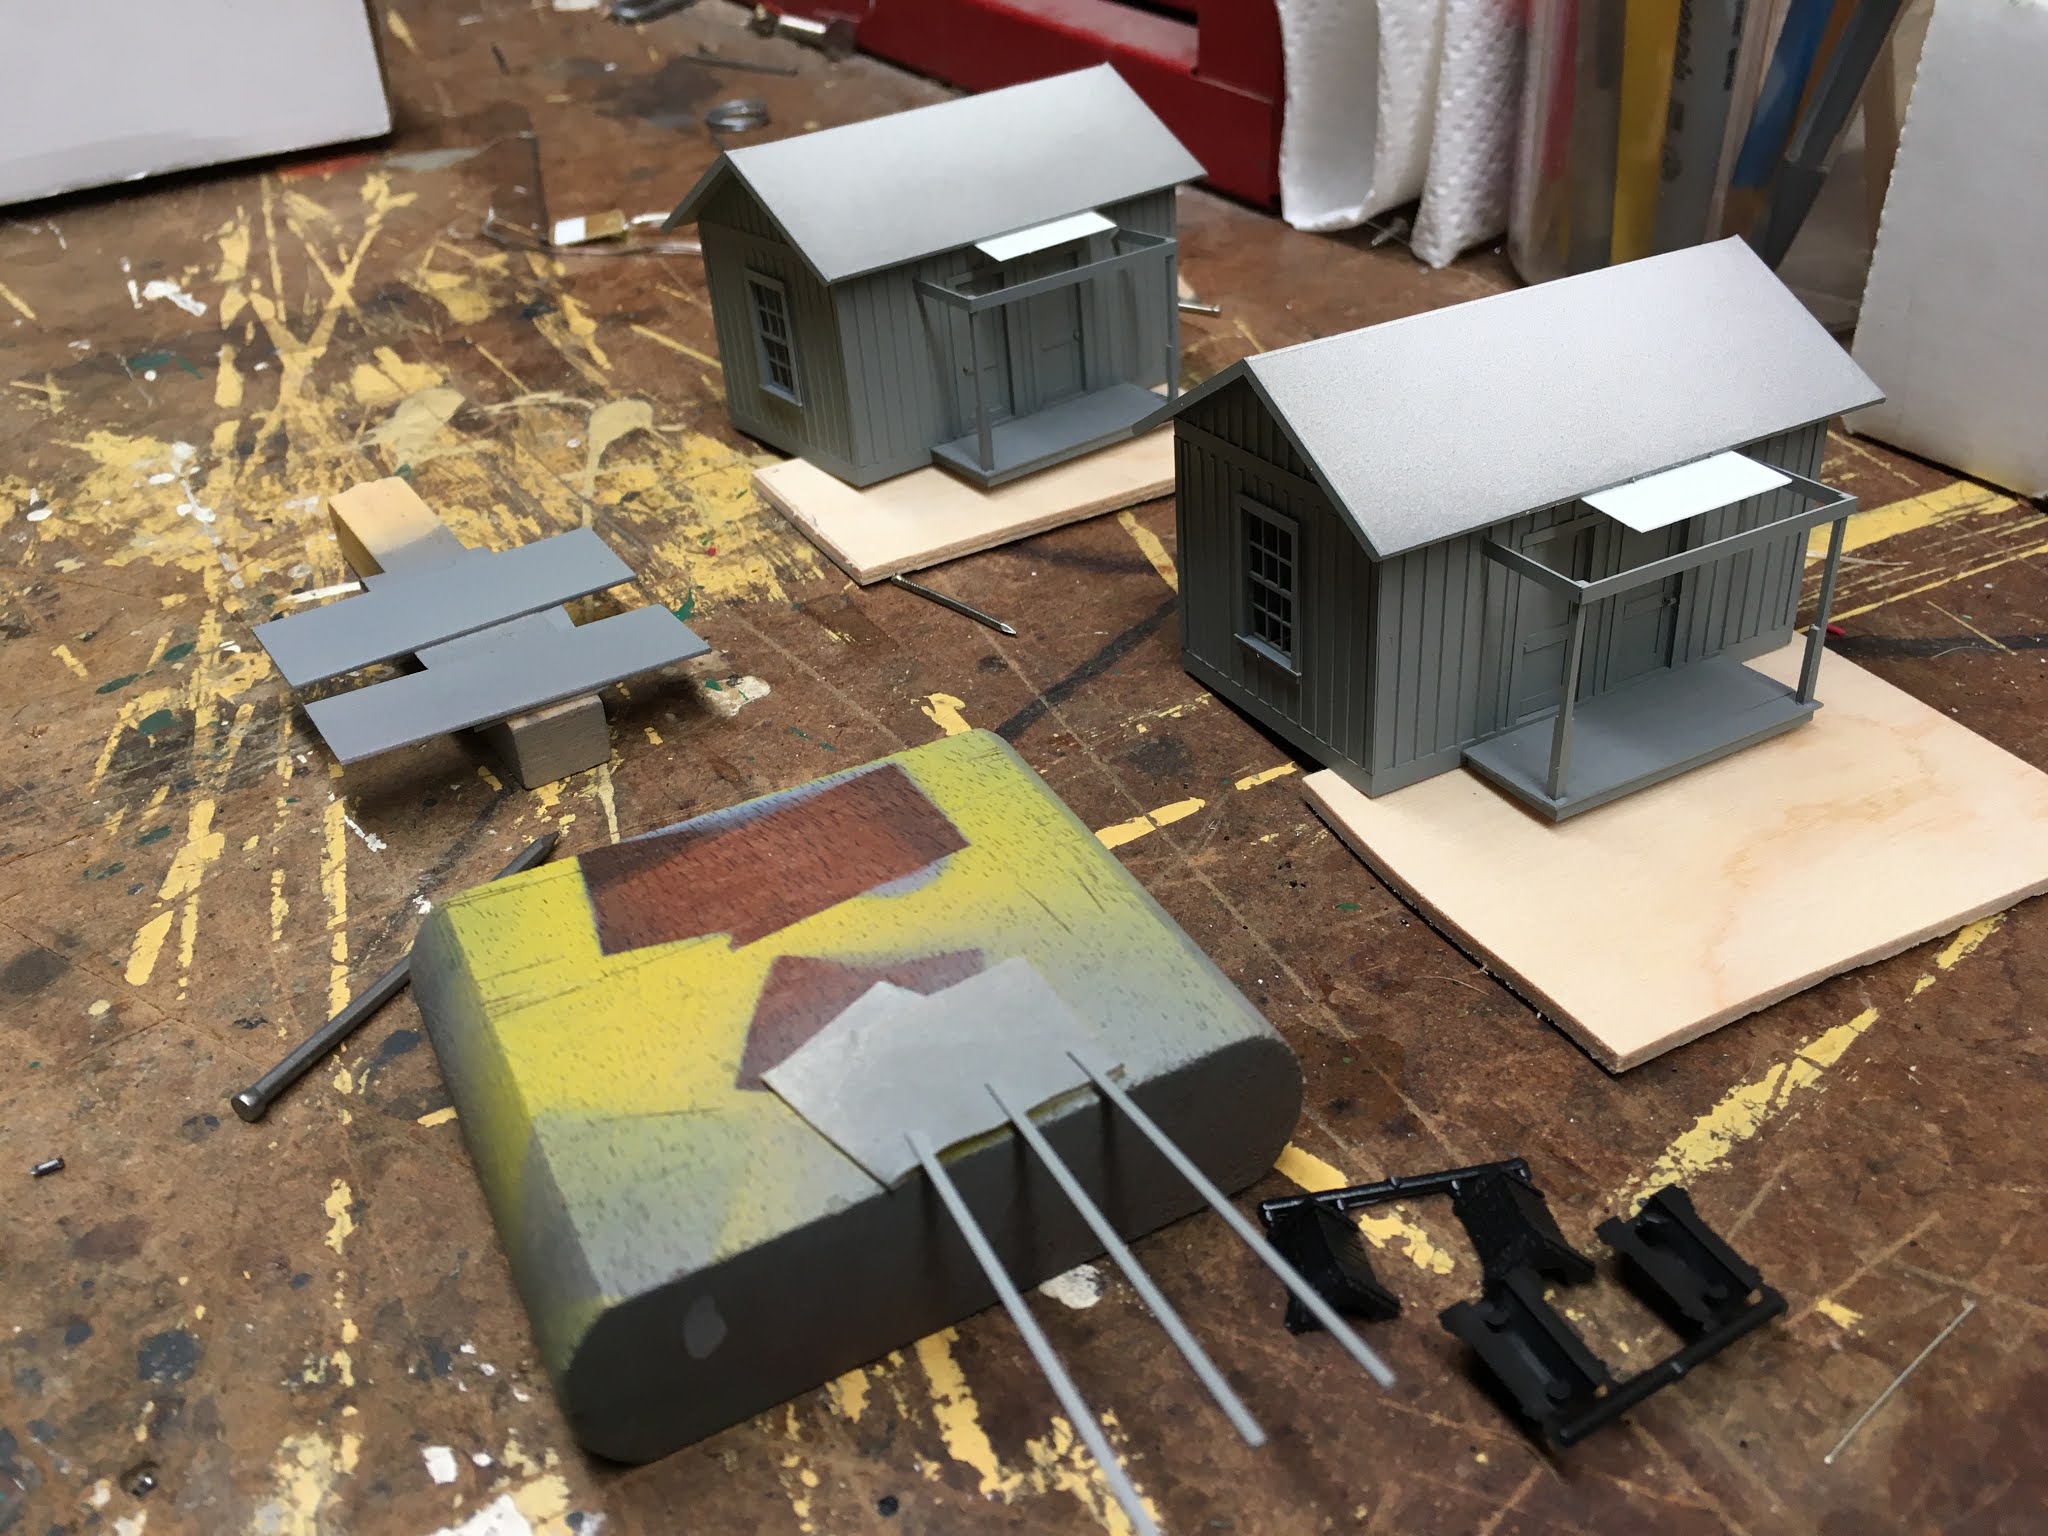
 Now that the sailboat is put away for the season, it's time to get back to work on the railroad. I did manage to get a few things done over the summer, including some progress on the bunkhouses mentioned in a previous post. The photo below shows the current state of completion.


The tabs over the porches will be used to attach the porch roofs which can be seen in the middle left of the photo. The 2x4's that were painted the same color as the bunk houses will be used for the porch railing. The next photo shows the scratch-built doors.


These two structures will be located to the west of the yard office at Nelsonville. The photo below shows the area. The back of the buildings will be supported by posts in the same fashion as the section houses at Quinnimont. 


And now for a sneak peak at what will be a new "industry" on the railroad. 


More to follow on this exciting project in the near future!

Monday, August 3, 2020

"... Ding..."

Several months ago, a link to a YouTube video circulated among some of us here in the Cincinnati area. It was a 15-minute clip of the dispatcher's office on the Clinchfield in Erwin, TN back in 1987. Here's a link to the video: https://www.youtube.com/watch?v=oxfhV8i9R-c. It's an interesting, behind-the-scenes view of a critical piece of railroading that we don't often get to see. And it was of particular interest to me because the Clinchfield was CTC over its entire length and the panel in the video is a Union Switch & Signal model.

As you would expect from someone who has studied the prototype for most of his life and relied on his observations in developing his own proto-freelanced railroad, Allen McClelland picked up on the annunciator bell. You can hear it ring whenever a train comes into a section of the railroad that is controlled by the panel. This alerts the dispatcher, along with an occupancy light, that a train has entered his area. And as you would expect from someone who is continually thinking of ways to improve operations, Allen asked Gerry Albers if there was some way to add a bell to the V&O panel on Gerry's Deepwater District VGN railroad. Gerry is a genius when it comes to anything electrical and is also deeply interested in prototype operations, and an annunciator bell of some sort seemed like a natural fit with his Signals By Spreadsheet system.

Fast forward a month or so and I found a reference to prototype CTC panel sounds on one of the forums I follow. It turns out that JMRI has most of the typical sounds in .WAV files on its website and those sounds are used in connection with JMRI's PanelPro CTC panel. I passed along the sound files to Gerry and he was off to the races.

In short order, Gerry found the small sound modules that are used in audio greeting cards. Not only were they relatively inexpensive, but you can record up to 30 seconds of sound on them. You can see one in the photo below.


There are two tabs that are connected to the board. The one with the red dot is the record button and the other one is the play button. Gerry figured out how to connect the play button to an SBS DIO card so that block detectors could be used to initiate the audio recording of the bell. And before you could say Shazam, the V&O dispatcher's panel had an annunciator bell. Whenever trains leave staging at either Gauley Bridge or Dickinson Yard and hit the first occupancy block, the CTC panel gives the dispatcher a "ding."

Of course, this is something that I just had to have. Gerry was kind enough to give me one of the cards along with instructions on how to wire it up. I mounted it on the inside of the dispatcher's panel as you can see in the photo below.


Two wires for 5V power and one wire to a DIO card was all it took to connect the hardware. A simple signal spreadsheet provides the link between the block detector and the card. So now when a train enters the railroad on either end of the board, well, see for yourself below.


These little audio cards are really neat, and we're already thinking about other ways they can be used to incorporate other types of sound into our railroad operations.

Friday, July 10, 2020

Inspiration- Part 3

Most of the scenes and structures on the railroad have been copied from the prototype in some form or fashion. It has often taken me a long time to find the right combination of structures and/or scenes in order to finish a particular area of the layout. By copying the prototype, at least to some degree, the scenes end up looking plausible and "right" in my eye. I've never been able to create something out of whole cloth that achieved the look I wanted.

A case in point is the collection of yard structures at Nelsonville. There has been an old wooden coach there for years that serves as the yard office. It's a wooden model that my Stepfather built many years ago. I painted it grey, added some roof details, and was planning to blank some windows, add a window air conditioner, and other details but lost interest at some point. You can see the structure here at the beginning of the video: https://www.youtube.com/watch?v=GlArolLdoXw. The intent with this structure was to copy a similar scene at Sproul, WV on the C&O. But there's just too much wrong with the old car to make it work. So the plan now is to copy the yard office at Elk Run Jct. which can be seen in the photo below by Jonathan Spurlock. The shanty on the right in the picture has already been built and is in service at Nelsonville.


There will be several structures along the tracks to the west of the yard office and I've been kicking around ideas for this area for a long time. I looked long and hard at the structures in the yard at Thurmond, WV but came to the conclusion that there just wasn't enough room. Also, the track by the yard office is a runner and not a RIP track like the one in Thurmond, so most of the structures wouldn't have been appropriate.

So next came the idea of some type of crew quarters. I have a number of photos and plans for C&O section gang houses, and these seemed like they might work. However, most of these are two room structures with an addition on the back. I would have to skip the addition as there isn't room for it. For that reason, I wasn't completely sold on this idea.

And then came the photo. Robert Slavy posted a photo of a bunkhouse at Quinnimont, WV on the C&O Fans Facebook page. I have never seen a photo of this structure before in any of the books I have on the C&O or in any of the articles on Quinnimont that appeared in the C&OHS Magazine. This was it- finally! And it was built  to the same design standard as the other structures I have already planned to use in the Nelsonville engine terminal!

As an aside, Robert Slavy has an incredible collection of photos that he took in and around C&O locations in West Virginia in the 1960's and '70's. He grew up in Pineville, WV and worked for many years in the region. He also has some great photos and videos of the Virginian Railway in and around Mullens and Elmore, WV. I met Robert at a Virginian Crazies weekend several years ago and he's a great guy.

Back to the bunk house. The picture below shows the structure sometime in the mid-1970's.


Note the board and batten siding so common on lineside structures on the C&O. And note the longitudinal board just above the window. This same style of architecture was used on many C&O buildings, including some of the ones in Hinton, WV. I scratch-built several of the Hinton structures based upon drawings by William Simonson that were published in Model Railroad back in the early 1990's. They can be seen in the photos below.


Two of the bunkhouses will fit perfectly in the space between the yard office and the motor car shed. Now all I have to do is get them built!

And, thanks Robert, not only for this picture, but also the many others that you have shared from your collection of C&O and VGN pictures. As many others have suggested, there's a book waiting to be written with all of your shots.