Showing posts with label Rolling Stock. Show all posts

Sunday, March 26, 2023

CHEX 372

 Fun but a foob. I've lost track of all of the changes and modifications that I made to this old McKean covered hopper. Every time I looked at prototype photos of these cars, I found something else that needed to be corrected. And it still isn't right. I'll let the rivet counters find all the flaws. But it was a learning experience, and I had a chance to do some things that I haven't done in the past. I sectioned and lengthened a Plano Models etched metal roof walk. I'm continually amazed at these kits- great instructions, everything goes together well, and they are relatively easy to build. And they look fantastic.


I also had the chance to rebuild the side ladders using flat brass stock and Tichy plastic grab irons. 


The prototype photo below shows what I was trying to achieve, although it was taken at a later date.


Now I'm off to work on a Tangent gon that needs nothing more than a little weathering.

Thursday, March 10, 2022

SCPX 3527

One of my favorite parts of the hobby has always been building freight cars. Back in the day, I would modify Athearn Blue Box kits, Robins Rails cars, and others to make reasonable representation of prototypes that weren't available commercially. And one of my all-time favorite authors is Bob Rivard. I have long been a big fan of his work and especially his freight car projects. I've collected all of his freight car articles I could find and have recently started building some cars based upon his work.

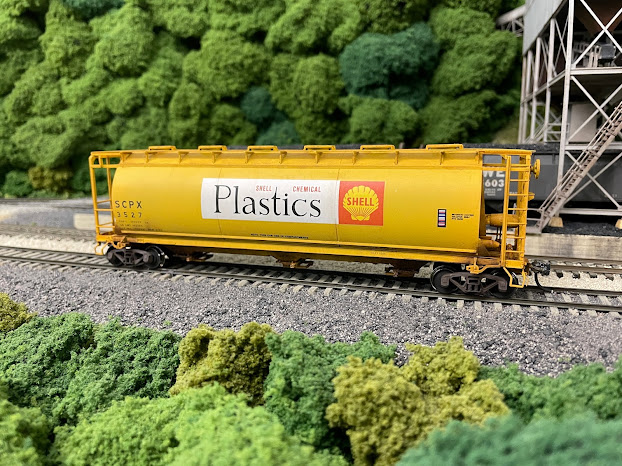
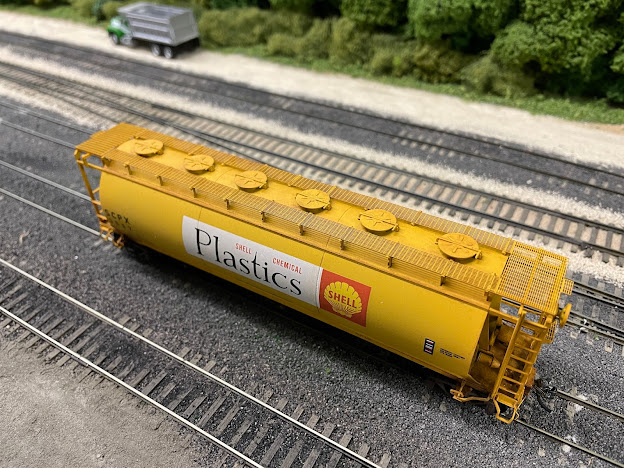
A case in point is SCPX 3527. Bob wrote an article in the December 2021 issue of Railroad Model Hobbyist on how he built this car from an Atlas cylindrical hopper car that he had picked up cheap at a show. I had the same car, but decorated for Penn Central, and I'd never been able to find a prototype photo of it. So, I gave it a bath in 91% isopropyl alcohol and ordered a Plano Model Products roof walk for the car. I also ordered the decals that Bob got from Bill Brillinger at Precision Design Company.

The only thing I did differently than Bob was I painted the model with Tru-Scale C&O/B&O yellow as I had that on hand, and it looked spot on to the photo I was using for reference.


This was the first time I've built a Plano roof walk and I was amazed at how well everything went together. The brackets have to be bent to shape, but this was relatively easy, and they fit right into the holes left from the Atlas roof walk. And they do make a difference, as you can see in the photo below.


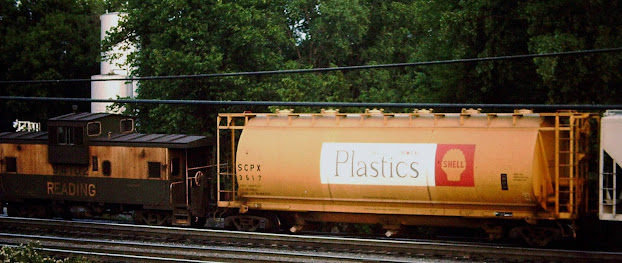
The photo below shows one of the prototype cars in May of 1976. 


This was fun build, and I've always enjoyed adding something to the roster that hasn't been offered by any of the manufacturers before. Of course, now that I've built this, Atlas is sure to come out with this paint scheme in the not-to-distant future... 


Thursday, September 16, 2021

Lost in the Fleet

 As part of my "Finishing Stuff" campaign that I started back in March of last year, I recently painted a 3-bay covered hopper car, two woodchip cars, and a 2-bay covered hopper to be used in sand service. These cars had languished in the paint shop for 2-3 years, victims of lost interest and inspiration for other projects. But it was finally time to get these finished. 

The 2-bay covered hopper is the last of the five cars that will traverse the railroad between supply sources and the engine terminals at North Pierce and Nelsonville. As I was decaling the car, I remembered back to the first one I built. It was the late summer of 1983 and I was living in Cleveland. I spent some time that summer in Cincinnati railfanning the Southern engine terminal in Ludlow, KY. You could almost always find a couple of covered hoppers in sand service like the one in the photo below.


E&B Valley had recently released their 2-bay covered hopper kit and it was exactly what I wanted for my sand service cars. I modified the side ladders like the ones on the SOU car and numbered it in the 99XXX series reserved for company service and MW equipment. 


So here we are, almost 40 years later, and the last one is finally being added to the roster. This is a Bowser car and I removed all of the cast on grabs on the ladders and replaced them with .010 styrene rod. The photo below shows the car as it's being decaled. And there are two other cars just like this in service already.


It occurred to me as I was working on this car that it is one of the "fleet" cars. Unremarkable, fairly non-descript, and unlikely to be noticed by any of the crew as a new addition. But it's one of the cars you need if your going to have some variety in the operating scheme and your rolling stock. Like all the hopper cars on the railroad, it's just another one that will be lost in the fleet.


Saturday, June 26, 2021

Inspiration- Part 4

 While looking through my Facebook feeds this morning, I came across a photo on the Freight Car Enthusiast page that really caught my eye. It's a picture of a 40' Penn Central boxcar painted in Bicentennial colors. While that's not unusual in and of itself, it's the fact that the car is assigned to wreck train service that makes it so unique. The photo was posted by Eric Werner and is from his original slide collection.


The caption for the photo said it was taken in Cleveland in 1976. If you look closely at the lettering under the road number, you'll see that it says "Collinwood." So one could assume that this car was assigned to the wreck train based out of the ex-LM&SS/NYC complex in Collinwood, Ohio, on the east side of Cleveland. Shortly after posting this photo, Eric posted a picture of the entire work train.


In the photo above, you can clearly see the old back shops and locomotive erection buildings that were part of the Collinwood yard. But what really caught my eye, in addition to the somewhat odd paint scheme for a wreck train, was the specific equipment. Note the two gons with panel track and the gon with trucks. Also note the coach and baggage car. On the far side of the baggage car is the boom tender along with the crane.

This photo is exactly what I needed to fill out the rest of the wreck train on the railroad. I'll add three gons like those above and similarly outfitted. Add a coach or some ex-troop sleepers and viola! Wreck train ready for service!

Friday, May 7, 2021

inspiration- Part 3

 Ever since Matt Snell delivered CWE business car no. 1 to the railroad, I've been thinking about how to incorporate it into an op session. It's been tagged onto the back of priority freights for a number of sessions, but that just didn't seem to do the beautiful car justice. Fortunately, I found some inspiration while surfing the internet recently.

The photo below shows Penn Central SPX-2L, an eastbound inspection train, in May of 1975. It consists of an SD45, a PC caboose that appears to be recently painted, and a PC observation car.


Talk about inspiration- this photo shows exactly the type of movement I wanted to replicate. So I grabbed one of the road's SD45's, one of the newest cabooses, and teamed them up with CWE 1. You can see the results below.


Train cards have been made up for the crews and they can be seen below.


The staging track assignments have been left blank and will be filled in based upon whatever tracks are open during a particular session. A wet erase marker insures that they can be used over and over again.

The photo below shows SPX-10 headed east through Big Chimney.


As my good friend Keith VandeStadt suggested, this train will be a show stopper- everything will have to clear up for it. I'd hate to be the dispatcher that put it in the hole for any reason! And I sure wouldn't want to be the employee that calls it the circus train- at least over the radio. Right, Bill Doll?

Monday, April 26, 2021

WC 17

 For whatever reason, maintenance of way equipment has always had a special appeal to just about anyone interested in railroads. For us railroad modelers, MofW equipment gives us the opportunity to build unique models with paint schemes that differ from the rest of the rolling stock on the railroad. And for those of us with operating railroads, the equipment gives us a chance to have special movements periodically.

The plans for a wreck crane on the CWE were hatched almost 40 years ago when I purchased one of the Athearn 200-ton crane kits. I clipped several adds for brass cranes of a more modern design from magazines over the years and saved them in the box with the crane. My plan was to eventually kit-bash a more modern crane from the Athearn kit. However, as the design plans for the railroad were developed and the operating scheme came together, it became apparent that a 200-ton crane would be based at one of the major yards, not on the modeled portion. Would a smaller crane be located at the yard at North Pierce? Perhaps. But the plans for WC 17 didn't fully gel until I found the photo below.


The photo shows one of the C&O's smaller cranes at Thurmond, WV and I'm guessing it's sometime in the 1960's but perhaps a little later. I don't know if it was kept there or not, but one could imagine it was stationed there to handle any minor derailments on the numerous branches that originated here. And it just so happens that Tichy makes a kit of this exact crane. That was all the inspiration I needed!

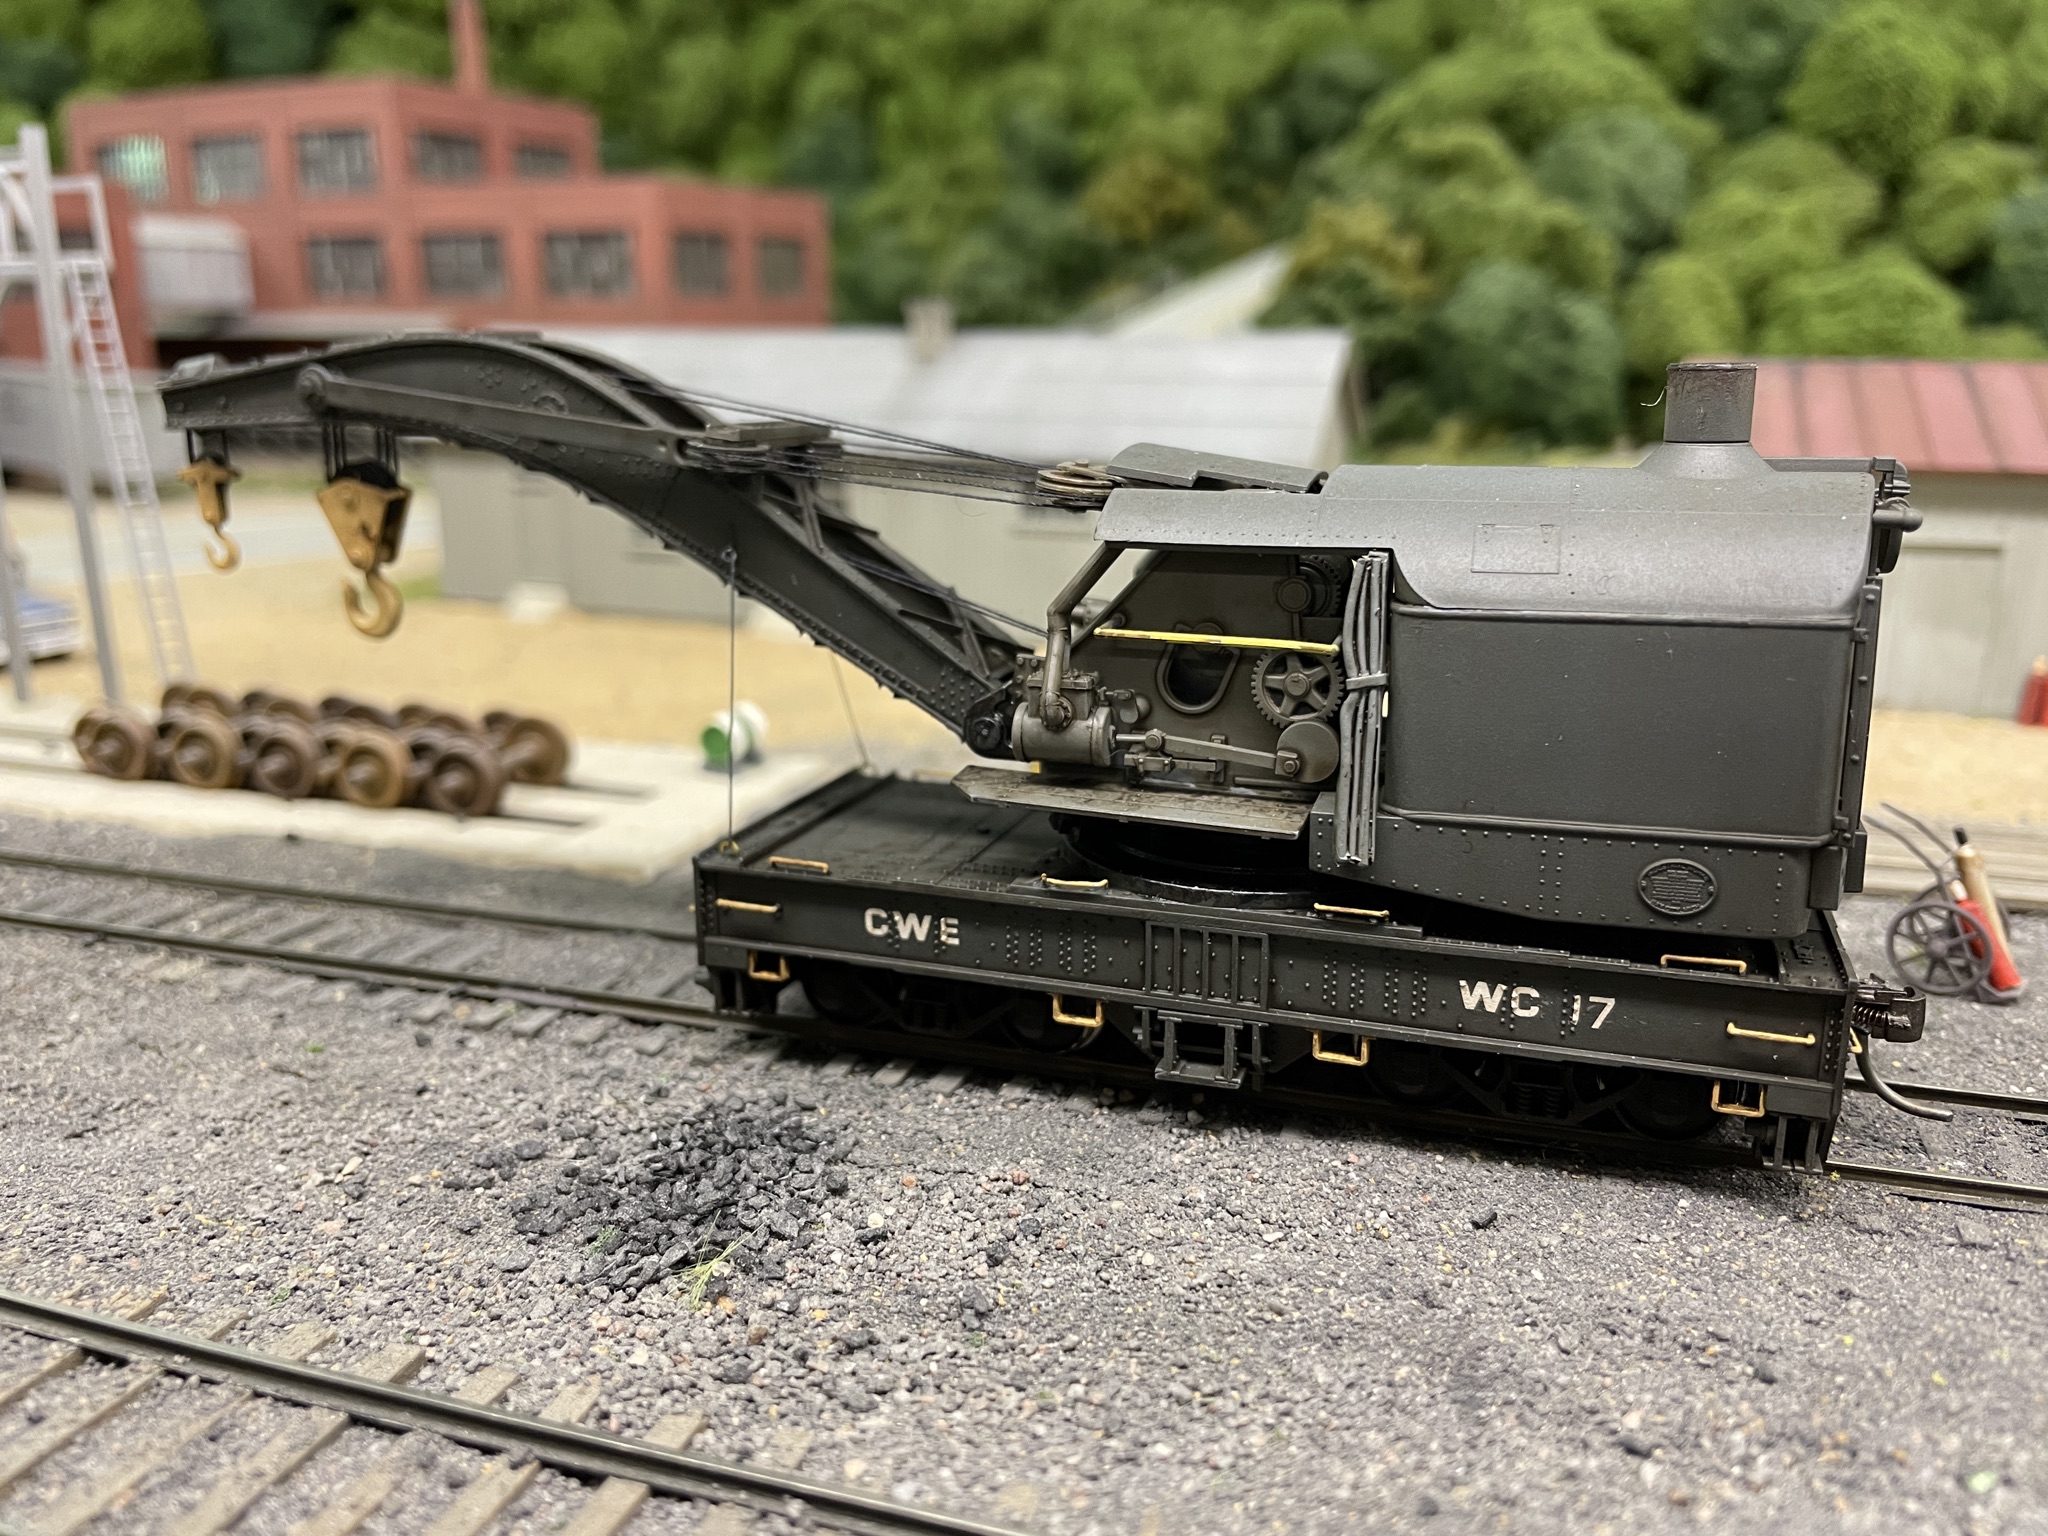
The photos below shows the completed model on the RIP tracks at North Pierce. 


The kit was a joy to build, and I'm really impressed with the design work. All of the pieces fit together beautifully, and it's very apparent that someone spent a lot of time and effort engineering how everything would fit together. The only additional detail that I added was the side curtains.


So the boom car that was built back in the mid-1980's finally has a companion. In addition to the recently completed baggage/tool car, there is a tender in the works. There will probably be a passenger car or two that will be added to the wreck train. And I'm not sure if it will be station here at North Pierce or somewhere else on the railroad. Time will tell. But the wreck train will certainly make an occasional appearance during an op session. And yes, it will be limited to 10 MPH.

Saturday, February 27, 2021

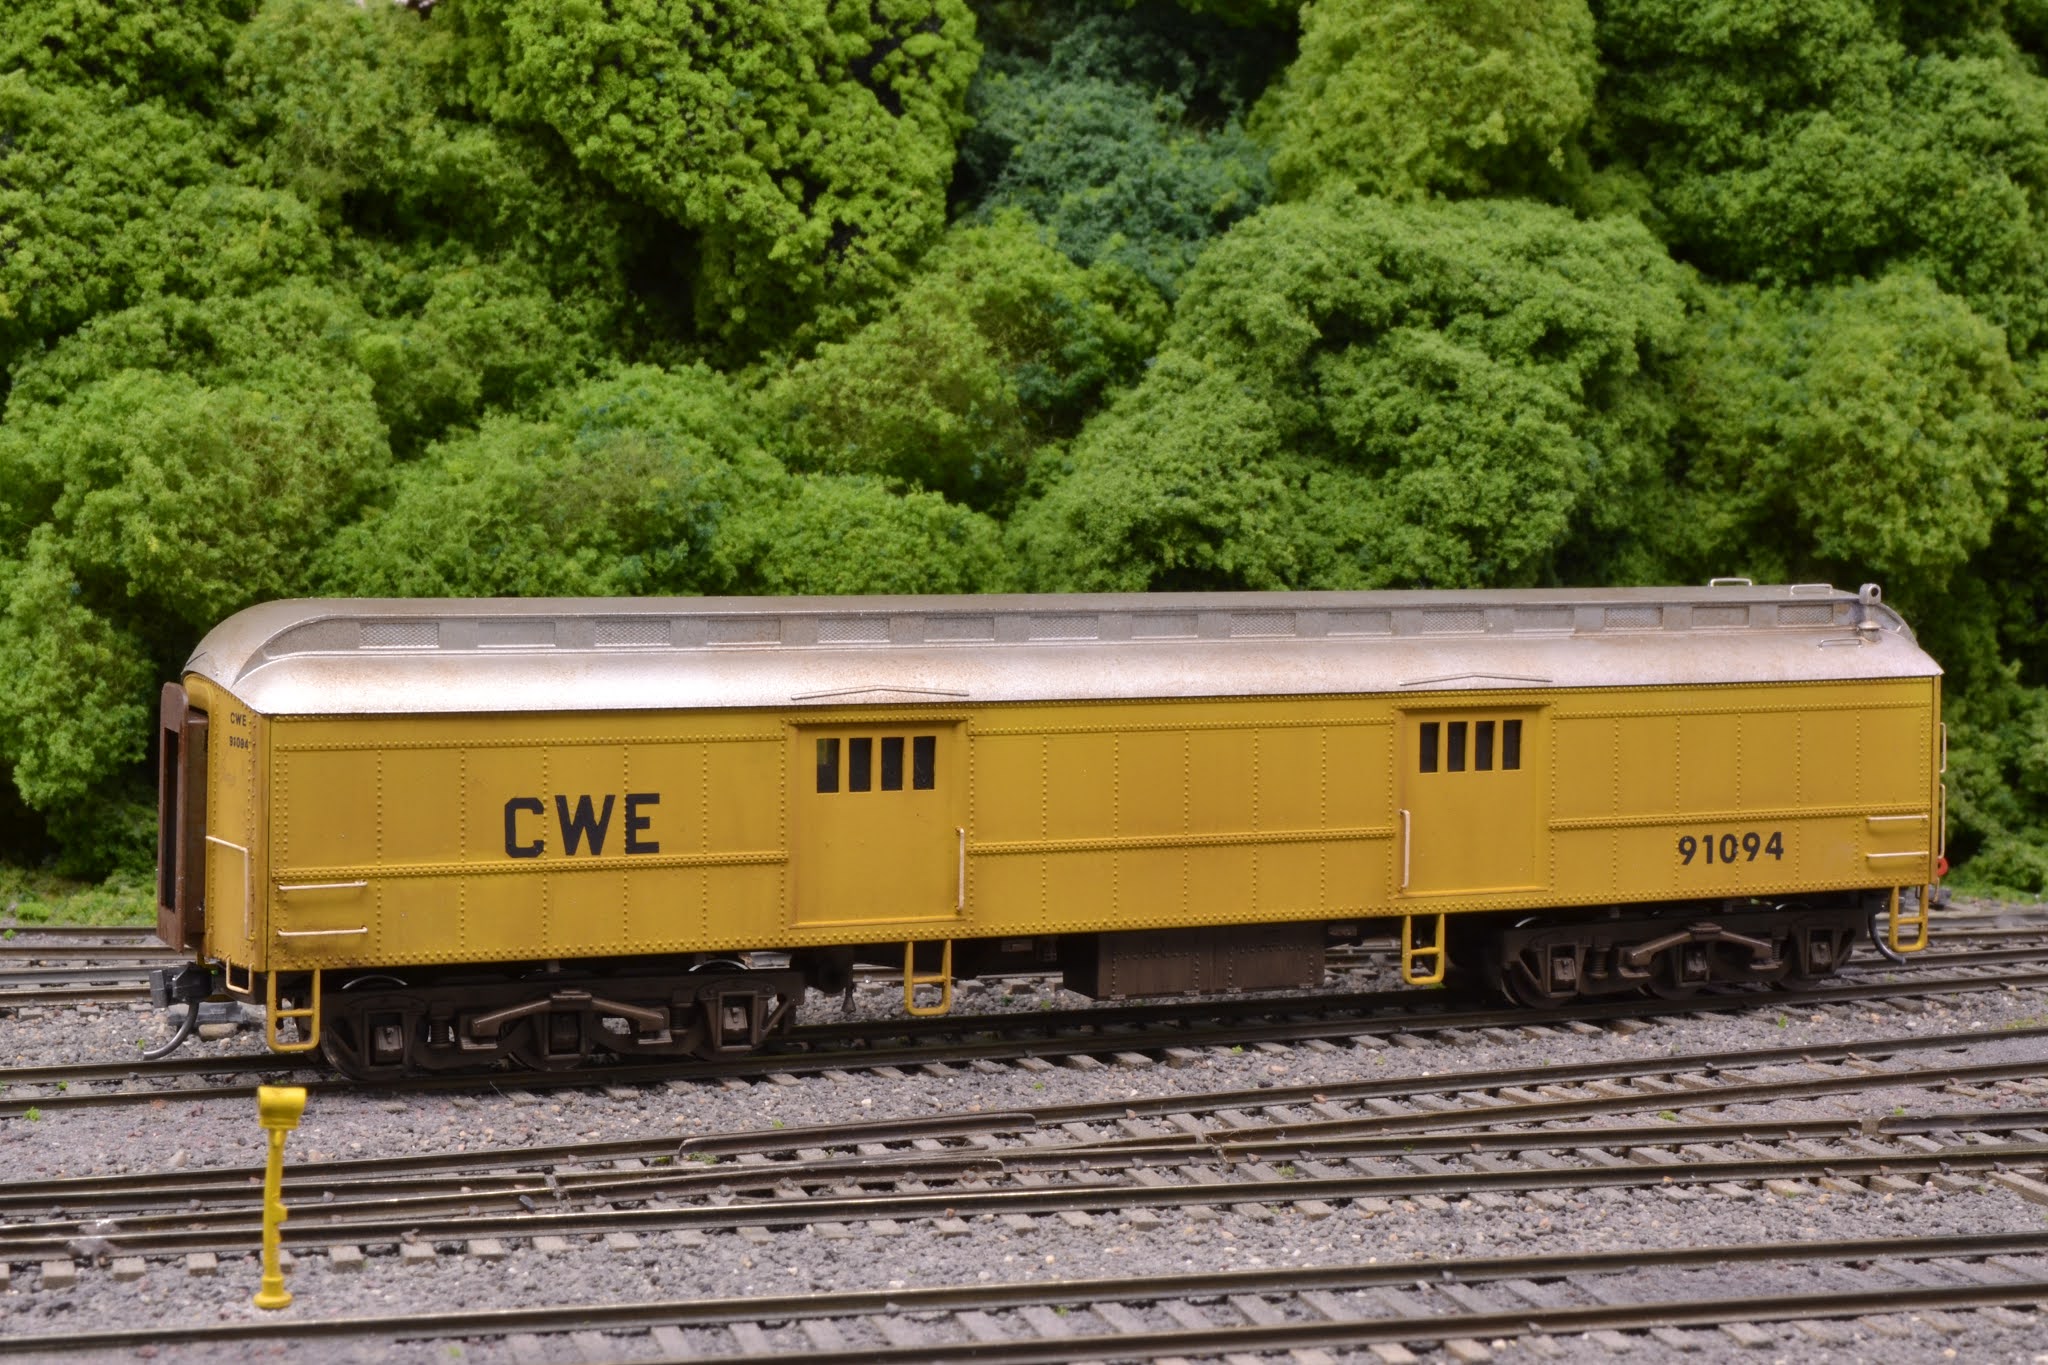
Tool Car 91094

The shops have been busy. The most recent addition to the roster is tool car 91094. I had planned to convert a couple of passenger and/or baggage cars for wreck train service ever since I read an article on kit-bashing them in Model Railroad back in the late 1970's. There's just something about MofW equipment and wreck trains that appeals to just about anyone interested in railroading.

The original plan was to modify a couple of Athearn Blue Box passenger cars. These cars measure a scale 74' over the coupler faces and are right at the limit of what will operate on the railroad given the tight tunnel clearances and 30" minimum radius curves. At some point, I started looking at shorter cars. Most of these have 4-wheel trucks, and I'm preferential to the look of 6-wheel trucks under passenger equipment. Fortunately, I found a Rivarossi 60' baggage car on eBay and it was reasonably priced. In addition, it came with wire grabs and some great looking underbody detail.

A trip through the paint shop followed by decals and weathering resulted in Tool Car 91094.


The sides were painted UP Armor Yellow and the roof was painted Vallejo aluminum. I studied a number of photos of various baggage cars in MW and wreck train service and was surprised at the lack of dimensional data and lettering. I had planned to add small "MofW" lettering or "Tool Car" on either side, but passed for the simplicity of what you see here. I am absolutely certain that I have never put so few decals on a piece of rolling stock.


The grab irons were painted white per the standard paint scheme for MW equipment and the ends of the diaphragms were heavily weathered with oil paints. The sides and roof were weathered lightly using artist's acrylics to represent a car that had recently been repainted.


This last shot shows the car in wreck consist. It will be joined soon by the Tichy 120-ton Brownhoist crane that's about to go into the paint shop.


When the wreck train is finished, it will occasionally make an appearance during an op session. It may also be stored temporarily on one of the RIP tracks at North Pierce.

Sunday, February 14, 2021

"What a long...

 ...strange trip it's been." At least with regard to getting this freight car on the railroad!

It all started back in the fall of 2017 when I purchased an Accurail covered hopper car at the local NMRA show. It was decorated for the PC and I intended to patch it and reletter it for Greg McComas' Michigan Interstate. You can read more about this car on this post: https://cwerailroad.blogspot.com/2019/10/finishing-stuff.html. I finally got the car painted, lettered for the K&LE, and prepped for weathering. And then into the paint shop drawer it went- a year ago last month.

While I am generally pretty good about finishing projects that I have started, there are those occasions when I just lose interest somewhere along the way. Such was the case with this car. It sat waiting to be weathered for over a year. About a week ago, I started perusing covered hopper car photos and sure enough, the inspiration came. I got out the gouache and powders and went at it. The photos below show the results.


This car was new in 1972 so it was weathered to reflect just four years of service. I mixed up a wash of light grey gouache using Windex and white, ivory black and a little burnt umber. The wash dries fairly quickly but can be manipulated for a long time. I took a rough bristle brush, wetted it with Windex, and then drew it down the sides to get the rain and dirt streaks. The same mix was blotted on the roof with a cosmetic sponge. The trucks received the usual mix of artist's acrylics and powders. While certainly not anything close to an award winner, it will look fine running the railroad in a grainer. And it's great to finally have this one done!


Monday, February 1, 2021

Back to the Future

The incredible M.R. Snell is at it again. He recently decided to add several buffer cars to the Conrail Shared Assets Operation fleet and he included a CWE car in the mix. As you would expect from Matt, the car includes all of the appropriate markings. He even went so far as to number the car in the same MofW/Company Service series that previous non-revenue car have been assigned. The photo below shows the car on the Oak Island Runner during a recent op session.


And speaking of back to the future, you'll note that the boxcar in the lower left hand corner of the photo is a Suffolk Northern Railway car. That's the proto-freelanced railroad of Keith VandeStadt, another one of the local crew and a frequent operator on the CSAO. The SNR is set in the late 1950's but there just happens to be a modern car roaming the rails in New Jersey.

It's a great looking car, Matt- thanks for including the CWE in the project!

Sunday, January 31, 2021

For the L&N guys

 As I've mentioned before, I rely on prototype photos for inspiration. Being able to see something in a photo from my era provides both the motivation and the colors to recreate it in miniature. And so it was when I came across the photo below of a yard in Allentown, PA in 1975.


I could model every freight car in this photo and have already done the Lehigh Valley X58 boxcar, albeit in a modified version of the old Athearn BB kit. But it was the L&N boxcar in the lower right hand corner that caught my eye recently. I seemed to recall having purchased a similar car from the second-hand inventory at the old Tim's Trains a while back. Sure enough- I bought two of them. They are the old Intermountain kits that were part of a run done by the Louisville & Nashville Historical Society.  I assumed the paint scheme and numbers were correct and a quick check with my good friend Stuart Thayer confirmed it. In fact, Stuart worked with Intermountain on the graphics for the kit. In addition to being a very accomplished modeler, Stuart is a long-time member of the L&NHS. He is also one of three members of the operating crew on the railroad that are dyed in the wool L&N fans/modelers. So it was only fitting that a few cars from their favorite railroad should show up occasionally during an op session.

I only made a few changes while building the kits. I added cut levers and wire grabs at the bottom right hand side of the ends and replaced the plastic stirrup steps on the left side of the sides. I also replaced the COTS stencils as the ones on the kit appeared too small to me. With the addition of metal wheels and an ACI label, the cars were complete.

The photo below shows the two cars after a trip through the paint shop. 


The roofs of the kit were painted the same blue as the rest of the car. It was difficult to see in the original photo just what the roof looked like, but it appeared to have some peeling paint in addition to some faded paint with perhaps a little rust. I blew up the photo to get a better look and you can see what I found below.


I decided to paint the entire roof silver and then come back and add some blue to represent the old paint. I used Vallejo Model Air Aluminum followed by Testor's DulIcote for the base layer. I then mixed Vallejo Model Color Medium Blue with a little white and applied it sparsely using a cosmetic sponge. I got a little too aggressive with the blue and ended up going back over the roof with some Aluminum applied with a cosmetic sponge. Lastly, I added a little artist's acrylic burnt umber to represent rust in a few locations. The photos below shows the results.


The trucks were weathered with the usual combination of artist's acrylics and powders. Once a few waybills have been made up, these cars will be ready for revenue service!


Sunday, January 24, 2021

Freight Car Redo- 2

Continuing with the freight car improvement program, I tackled an old E&B Valley 65' mill gon this past week. I built this car back in 1991 and was pleased at the time with the weathering. I used oils to represent rust on the exterior and a wash of oils mixed with ground foam to dirty up the interior. However, the car had that monotone look that came from a lack of detailed weathering on the trucks and a basic overspray of Floquil Grime. The photos below show the car before the trip through the shops.


These old E&B kits took a lot of work in order to get them to look good and run well. In addition to adding weight to the underframes, the truck bolsters needed to be modified. This resulted in the removal of the sleeve that the trucks fit over, and if you then used the trucks that came with the kit, there was way too much side-to-side play in them. Consequently, they wouldn't track very well and were prone to derailment. I decided that if I was going to spend time re-weathering these cars, I was going to fix the truck problem.

I dug through my parts and found some old Kadee sprung trucks that have a small hole in the bolster for the mounting screw. Using a 2-56 screw, this eliminated almost all of the side-to-side play. Next up was weathering. I used a combination of artist's acrylics, AIM powders and MIG pigments to improve the overall look. The photos below show the results.


Now the car can be billed to go anywhere on the railroad and not be restricted to one of the branches. Guess that means I need to come up with a load of some kind!

Thursday, December 24, 2020

Why am I doing this?

Talk about a project that was completed in fits and starts, these two gons take the cake. Many years ago, I purchased a Concor 52'6" gondola kit that included steel coils, coil troughs and hoods. Somewhere along the line I found another one, probably at a train show. I had always intended to build these for the home road and paint them in a similar scheme to those found on the C&O/B&O/Chessie System in the 1970's. The photo below shows how Chessie marked these cars especially for coil service. In addition to the two yellow panels on the side and the "COILS ONLY" stencils, the interiors of the cars were painted yellow. This was supposed to help alert crews and shippers to the special loading requirements.


So this past May, I took the kits to Michigan with the intention of building them over the summer. I had built one of these kits before for general service, and I remembered that the underbody had to be modified in order to lower the trucks. And lowering the trucks meant changing the coupler pockets and end sills. There was a great article many years ago on how to do this, but of course I couldn't find it. So I looked at the bottom of the one I had built previously in order to figure out what needed to be done.

So I started hacking away at the bottom of the car. I knew it wasn't going to be pretty, but I wasn't building this for a contest and no one was ever going to see the bottom of it anyway. The photo below shows the modifications to lower the trucks and raise the coupler pockets.


The next step was to glue the underframe pieces to the body. Armed with a few clamps and some wood blocks, the next step was easy.


As I was working on the underframe, I was also looking at the sides and ends and trying to determine what needed to come off and be replaced with some finer detail. It soon became apparent that just about everything had to come off. About this time, I began to wonder why I was spending all this time hacking away on a kit that was at least 30 years old and lacked all of the finer detail that's available on RTR stuff today. I was about to throw in the towel when I came across the photo below.


The picture taken by Steven Brown shows Clarke Avenue Yard in Cleveland on the old B&O. What caught my eye was the gon behind the switcher. Note the yellow interior- this is clearly one of the coil gons and it's in pretty good shape. And while it is difficult to see in this photo, the car has ladders on the right side. I had been working on a resin kit of a SOU gon and it had ladders on all the corners. So it occurred to me that I could use ladders instead on grabs on the corners. And there was the additional inspiration I needed.

Next up, I carved off most of the detail and added new ladders and stirrup steps. I also added some etched walkways pieces to the solid platforms by the handbrake. As I wanted the cars to be able track well while empty, I also added some shot to the bottoms. Remember- I said that no one was going to see the bottoms! The photo below shows the cars at this point.


With the cars complete, I now turned to the hoods and troughs. My efforts here didn't last long as it became apparent that the hoods would require major work. In addition to adding grab irons all around, the braces for the top that came with the kit weren't going to work. I started looking through kits I had on hand and online but couldn't find anything that would work. I really didn't want to scratch-build these, but I was too far into this project to turn back. So the cars sat for awhile.

Sometime later, I came across a photo of the B&O gons with a caption that said these cars were rebuilt for hot coil service and as such, didn't have hoods. Bingo! That was exactly the inspiration I needed to finish these up. I dug through my coil car photos and found the one you see below.


A cradle like the one in the gon would be easy enough to build out of styrene shapes. A quick search through my supplies yielded exactly what I needed. So the last piece of the puzzle for these two cars was finally in place!

Several trips through the paint shop, some home road decals, and this project was finally complete. The cars received light weathering as they were rebuilt in September of 1975. The photos below show the final results.


So why did I do this? Several reasons. First, I had always wanted to have a couple of coil gons like these decorated for the home road. Second, I still enjoy taking some of the old standards and making something somewhat acceptable out of them. And lastly, one of the really neat things about proto-freelancing is that you can come up with rolling stock like this. While there's no specific prototype for the car, it is based upon prototype principles and practices. And hopefully, I've followed those closely enough to make it appear as thought there could have been prototype for it.

Wednesday, December 9, 2020

Freight Car Redo- 1

 For the past six months or so, Bob Fallowfield has been going back over his fleet of cars with an eye toward updating and/or redoing the weathering on them. I've been following his progress on his Galt Sub of the CP Facebook page. Bob models the late 1970's- early 1980's so a lot of his freight cars are of interest to me. He does some really beautiful work, and I've learned a few new tricks from him. But what I've really taken away from watching his progress is the desire to go back and do the same thing with my fleet. The first to go through the program is C&O 619112.

This is one of the Walthers RTR cars that came out in the mid-1980's. I removed all of the cast on grab irons and replaced them with Details Associates wire grabs, replaced the stirrup steps with A-Line parts, and replaced the roofwalk with an etched metal one. It was a lot of work. Once the new parts were on, I masked off the rest of the car and sprayed over the ends and the ends of the sides with Scalecoat II (I think- it was a long time ago!). I painted the trucks a rust brown color and then weathered the car with a light dusting of Floquil Grime. The weathering was based upon a color photo that appeared in Rail Model Journal back in the day. Satisfied with the results, it went on the railroad.

At some point in the not-too-distant past, I came across a photo of one of these cars and noticed that the bottom was blue. Sigh. A quick check of other cars in this series showed that all of the bottoms were painted Chessie Dark Blue, as were almost all of the covered hoppers painted in the Chessie scheme. So I grabbed the old car, looked at the bottom, and realized it would be a chore to mask it off and repaint it. So it sat a while longer.

A few weeks ago, it occurred to me that I could brush paint the bottom. It certainly didn't have to be perfect. I could just mix up a blue that closely resembled the Chessie paint and have at it. I could also redo the weathering which I had never really been satisfied with. The photo below shows the results of the paint job.


When new, the trucks on these cars were painted the same blue color as the bottom. I thought I could capture this look with some artist's oil dabbed on with a cosmetic sponge. It wasn't a one shot fix as I had hoped. I ended up going back over the trucks with a wash of artist's acrylic burnt umber and then finished it off with Pan Pastel highlight.

The final step was to add some wheel splatter to the ends and touch up the coupler pockets. The results can be seen below.


It's nice to finally have this car looking more like the prototype. Given all the time and effort I had put into it back in the day, I really didn't want to abandon it. Will the crews notice the improvement? Unlikely. But at least I won't be inclined to turn my head away every time I see it!