Several months ago, a link to a YouTube video circulated among some of us here in the Cincinnati area. It was a 15-minute clip of the dispatcher's office on the Clinchfield in Erwin, TN back in 1987. Here's a link to the video: https://www.youtube.com/watch?v=oxfhV8i9R-c. It's an interesting, behind-the-scenes view of a critical piece of railroading that we don't often get to see. And it was of particular interest to me because the Clinchfield was CTC over its entire length and the panel in the video is a Union Switch & Signal model.
As you would expect from someone who has studied the prototype for most of his life and relied on his observations in developing his own proto-freelanced railroad, Allen McClelland picked up on the annunciator bell. You can hear it ring whenever a train comes into a section of the railroad that is controlled by the panel. This alerts the dispatcher, along with an occupancy light, that a train has entered his area. And as you would expect from someone who is continually thinking of ways to improve operations, Allen asked Gerry Albers if there was some way to add a bell to the V&O panel on Gerry's Deepwater District VGN railroad. Gerry is a genius when it comes to anything electrical and is also deeply interested in prototype operations, and an annunciator bell of some sort seemed like a natural fit with his Signals By Spreadsheet system.
Fast forward a month or so and I found a reference to prototype CTC panel sounds on one of the forums I follow. It turns out that JMRI has most of the typical sounds in .WAV files on its website and those sounds are used in connection with JMRI's PanelPro CTC panel. I passed along the sound files to Gerry and he was off to the races.
In short order, Gerry found the small sound modules that are used in audio greeting cards. Not only were they relatively inexpensive, but you can record up to 30 seconds of sound on them. You can see one in the photo below.
There are two tabs that are connected to the board. The one with the red dot is the record button and the other one is the play button. Gerry figured out how to connect the play button to an SBS DIO card so that block detectors could be used to initiate the audio recording of the bell. And before you could say Shazam, the V&O dispatcher's panel had an annunciator bell. Whenever trains leave staging at either Gauley Bridge or Dickinson Yard and hit the first occupancy block, the CTC panel gives the dispatcher a "ding."
Of course, this is something that I just had to have. Gerry was kind enough to give me one of the cards along with instructions on how to wire it up. I mounted it on the inside of the dispatcher's panel as you can see in the photo below.
Two wires for 5V power and one wire to a DIO card was all it took to connect the hardware. A simple signal spreadsheet provides the link between the block detector and the card. So now when a train enters the railroad on either end of the board, well, see for yourself below.
These little audio cards are really neat, and we're already thinking about other ways they can be used to incorporate other types of sound into our railroad operations.
At the end of last month, Mike Burgett posted pictures of a switch stand he recently added to his beautiful C&O's Alleghany and James River Subdivision. But this wasn't just any switch stand- it's a model of a specific Union Switch & Signal hand throw switch mechanism for an electrically locked, hand operated switch used by the C&O in CTC territory from the mid-1940's right up through CSX. As Mike describes it "a US&S style T-21 switch and lock movement equipped with a SL-21a force drop electric switch." It's available from Shapeways and is exactly what I need for a number of locations so, of course, I had to order a bunch.
These switch stands are used in locations where the dispatcher controls the locking mechanism but the turnout must be thrown in the field. Turnout 361 to the spur at Logan is one such location and the photo below shows the lock on the dispatcher's panel.
The photo below shows the mechanism installed at the turnout.
Crews working BC-10/11, the local to Big Chimney and back from North Pierce, have to call the dispatcher to unlock the turnout to the spur at Logan. Once their work is complete, they need to inform the dispatcher that the turnout is lined for the main and ready to be locked back up. If they leave without lining the turnout for the main, the dispatcher won't be able to lock it up. And when the turnout is unlocked, the dispatcher can't line a route into Logan from either direction.
The photo below shows the mechanism installed at the west end of the short passing siding at Summit Springs. Both ends of the passing siding are electronically locked, and the crews working either mine at Summit Springs must call to get them unlocked.
The last example is the crossover at North Pierce from the main into the yard.
Crews will now be able to distinguish between dual control turnouts and electronically locked, hand operated turnouts simply by looking the switch stand. A big thanks to Mike Burgett for the heads up on these.
This past week, I finished the last signal bridge on the North Pierce Subdivision. With the installation of the signals controlling the west end of North Pierce, the railroad is now fully under CTC control.
Oddly enough, the first signals ever placed on the railroad were located here. The photo below shows the original signal bridge.
Yep- that's a kitbashed Bachman bridge. Unfortunately, I built it long before I learned about the prototype practices of the C&O. As a result, the LED's were in the wrong positions in the targets. There were several other aspects of the bridge that I never liked, so I vowed to replace it at some point.
The new bridge is an Oregon Rail Supply kit that was modified to fit the location. There are still some final details to be added and scenery to touch up, but the basic bridge is in place and operational.
It's been a long, long journey to get to this point, but the CTC project is finally complete. And operating the railroad with the dispatcher's panel is everything I had ever hoped it would be. A dream come true indeed!
As of this morning, I am declaring victory in the campaign to build an operating replica of a Union Switch and Signal CTC panel for the railroad. The last few remaining pieces of hardware were installed last night and configured this morning. The photo below shows the results.
And here's one last look behind the scenes.
There are still a few signals to place in service and a switch lock to install at the west end of North Pierce, but the panel is complete. This project is a dream-come-true for me. And it wouldn't have been possible without the help of many individuals, including Bill Ford, Randy Seiler, David Stewart, Mike Burgett, and all the others who have written articles about signalling and dispatcher's panels in the past. But most importantly, this would never have happened without the guidance and direction of Gerry Albers. In addition to providing his Signals By Spreadsheet product, he was instrumental in helping me learn how to actually make this all work. I am eternally grateful for his inspiration, friendship and patience. I am truly blessed to have met him, along with all the other fine people who have become great friends through this wonderful hobby of ours.
Now it's back to building more rolling stock and locos!
It was almost one year ago to the day that the steel panel arrived. Before me was the daunting task of transforming it from what you see in the picture below into a functioning CTC panel.
To be perfectly honest, I was a bit overwhelmed. There was so much to figure out, from the hardware to be used to the electrical wiring to the paint color. And I had never tackled a project like this before. Fortunately for me, there are others who have, like Gerry Albers and David Stewart, and they were more than willing to offer help and advice.
So after a year of working on this thing, where are we? Well, the photo below shows how it appears today.
And here's a look at where all of the magic happens.
So the railroad is now under CTC control from SJ Cabin at the east end of Hollister Yard in North Pierce all the way to New Market, VA (east staging). All that remains to be done is the signal bridge at the west end of Hollister Yard and the eastbound signal just west of North Pierce. Yes- the end is in sight.
The new signals at the east end of Hollister Yard include the cantilevered bridge pictured below. These two signals control the main and siding eastbound at SJ Cabin.
As this bridge is right next to an area where the yardmaster is usually working, I installed a piece of Plexiglas to protect it from wayward forearms and elbows.
Also part of the CP at SJ Cabin is the dwarf at the east end of the yard lead.
And the last piece of the plant is the westbound signal at the entrance to the yard. This signal controls the main and the siding to the west of the turnout in the photo below in addition to the entrance to the yard.
During the last session, CTC was in place from east staging all the way to Petersburg Junction, which is just east of the signal above. As I suspected, the pace of trains over the road picked up significantly using CTC versus the old method of track warrants. It's clear that we'll need more overhead trains in order to keep the crews busy while giving the yards enough time to do their work. Which means more locos, freight cars and cabooses are needed! And that was the plan all along.
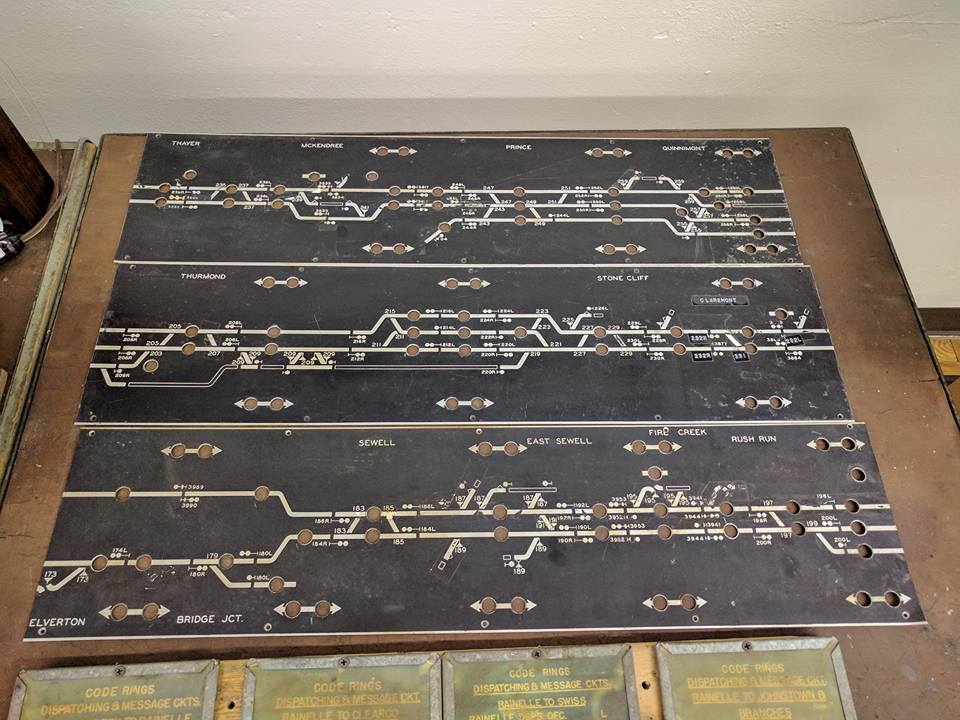
The new track model board arrived on the railroad yesterday, and all I can say is- WOW! Tyler Woodward, the graphic designer at Awards of Excellence in Dayton, OH, did an incredible job of copying my drawing and engraving the panel. Below is a shot of the results.
Drawing the model board by hand allowed me to use the appropriate US&S symbols and schematics. I used the photo below of the C&O board from the New River Subdivision as a reference source. I also used information from Mike Burgett's Control Train Components website which can be found here: http://www.ctcparts.com/.
The photo below shows a close-up of the engraving.
Now that the board is installed, I'll go back and spray all of the sheet metal screws flat black.
A special shout out to Tyler Woodward for turning the board around so quickly. He sent me proofs of the artwork just a day after I delivered the original drawing. And the time it took from the initial phone conversation to installation on the dispatcher's panel was exactly one week. Just some really great service.
The last remaining pieces of hardware for the board are the photo etched aluminum switch, signal and lock plates from Mike Burgett. More to come on this.
The panel for the east staging yard has finally been replaced. The old panel was thrown together when I first started holding operating sessions and it has always confused the crews. In fact, the east staging yard was controlled by two separate panels which really made things interesting. And for whatever reason, I never thought to provide some type of instructions at the panels. No wonder everyone was confused!
The new panel utilizes pushbuttons for turnout routing using Gerry Alber's Signal By Spreadsheet products.
Note the westbound repeater signal on the panel. Now that CTC is in place from East Staging to Cedar Falls Junction, the dispatcher will be able to route trains through Nelsonville and beyond. The yard limits from East Staging to just west of BA Cabin have been eliminated and the Nelsonville Yardmaster will now need to contact the dispatcher in order to "open up" and access the main. The shot below of the dispatcher's panel shows the route lined through Nelsonville.
And the next shot shows the green indication on the East Staging panel. The new instructions inform the crews to turn on the power to the appropriate staging track, acquire their locomotive, and then call the dispatcher for clearance west. The crews can depart when given either a green or yellow board on the panel.
The issue with the track model board on the dispatcher's panel has been resolved, too. As I couldn't find any software that I could use, I drew it up to scale using my old drafting equipment. I laid out all of the signals, place names and turnout and lock numbers in PowerPoint and then glued them to the drawing. The end product was dropped off at the engraver's yesterday and it should be ready in about a week. It will certainly be an improvement over the Avery labels that won't stay on!


