Friday, December 29, 2017

The End is Near...

No, not the end of the world. And the title doesn't even refer to the end of 2017 although that is rapidly approaching. It's the end of the poly fiber trees that is near. Over the past week or so I finished covering the Styrofoam lift-out behind the engine terminal at North Pierce. I waited to cover the lift-out until all of the tracks were operational in service area and the ballasting and scenery was finished. The photo below shows how this area has looked for a long, long time.


And the photos below show the results of the recent work.


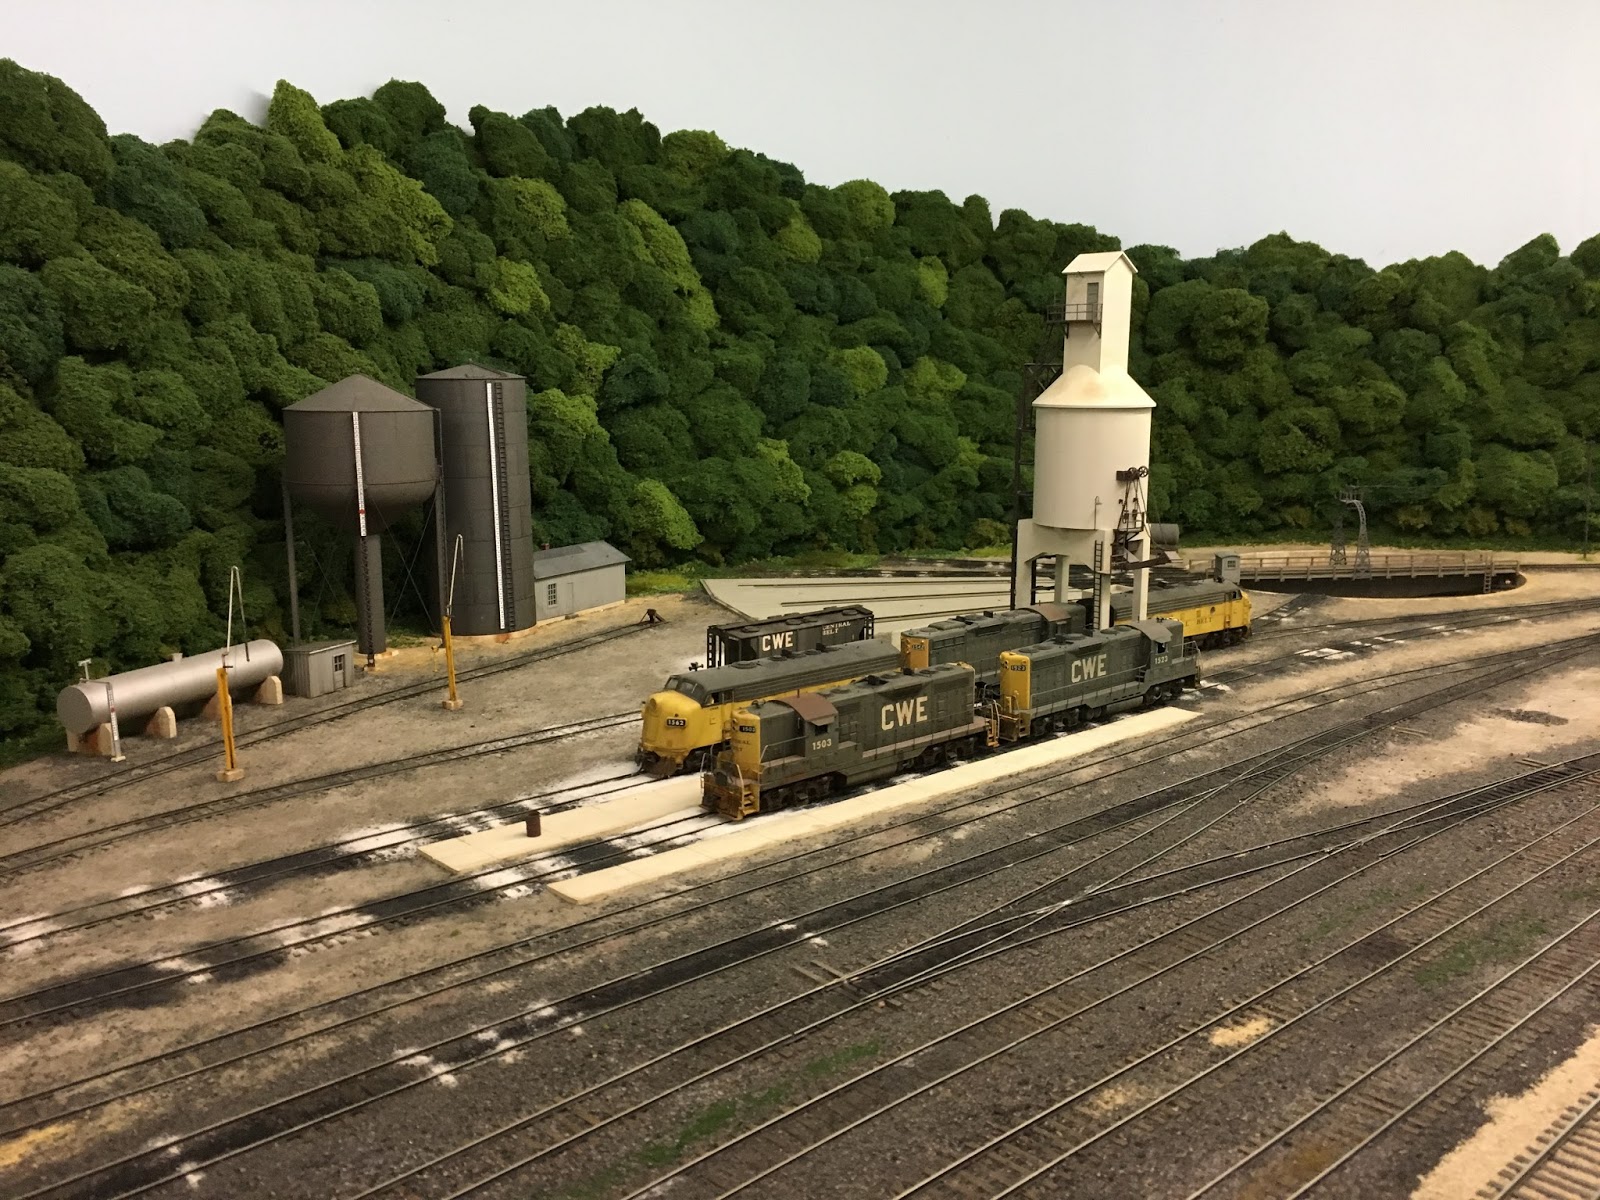
A quick observation about the light green colored trees- that color will fade over time. I assume it's due to the fluorescent lighting, but it has happened all over the railroad. The colors all fade slightly and end up with a subtle variation that works well in my environment. Also, there will be another post soon on how the engine terminal was ballasted and the momentum is has provided for structures in this area.

So after what feels like fifty years and tens of thousands of trees, there is only one, small stretch of hardshell that remains to be covered. The photo below shows the hillside by the to-be-built Austin Coal tipple in Nelsonville. While I'm close to the design of the structure, it hasn't been finalized yet. And I want to wait until the plans have been developed before I start scenery in this area.


While a large number of projects remain to keep me busy, and as we all know, a railroad is never finished, for the very first time it has begun to feel as though the layout is approaching the point where it is largely complete. And that means it's time to seriously start planning for the expansion into the crew lounge. Stay tuned.

Saturday, December 23, 2017

Wheels of Time Lumber Load- Finale

Well... that was just awful! As easy as it was to assemble all of the individual loads, applying the straps was a true PITA. I used thin black tape which has an adhesive on the back but the strips are so thin that the adhesive wasn't much help. The straps still had to be held in place until the ACC dried. And it just seemed like it would never end. After I finished the first row, it became obvious that I was never going to get through two loads this time around. So I punted and only completed one of them. But alas, one of them is done- see below.


As I was working to complete the load, I struggled with how I was going to make it removable. Last night, I looked through the folder I have with old flatcar articles in it and the solution was in the very first article. Bob Rivard,  who's work I have long admired, did an article in the January 2014 issue of the NMRA Magazine titled "Modeling Canadian Pacific Flatcars." Bob used a trio of Proto 2000 flatcar kits for his article, and he described in detail how he made the lumber loads. In order to make the loads removable, he took four pieces of 2x6 basswood, cut them to the width of the deck, and then inserted pins made of wire to hold them in place. He then glued the load to these pieces. It's a brilliant solution, and I copied his technique. The only difference is I used two pieces of 2x6 instead of the four he used.


For appearance sake, I may go back and two more. And the load really does need some additional blocking in order to be prototypically correct. I may yet try and figure out how to do that as well, but for now, I'm declaring this project finished- finally!!!

Saturday, December 16, 2017

Photo Fun

As I walked out of the railroad room the other night, I saw DC-15 out of the corner of my eye. The train is in the process of being re-staged at Nelsonville and it looked like it might be a neat photo opportunity. So this morning I grabbed the camera to take a few photos.

The photo below is the shot that I initially thought would be the best. It's a view across the leads to the engine terminal.


While I like the perspective and the detail in the photo, the train that was supposed to be the focus of the shot is too far away. So I tried another angle.


This photo keeps most of the detail but brings the loco a little closer. Still, it wasn't quite the shot I wanted. So I changed the angle just a bit and zoomed in a little closer.


This one is much closer to what I had seen in my minds eye when I first thought of the photo opportunity. But just for kicks, I thought I'd shoot it from a slightly different angle.


While you can see the locomotive much better with this angle, it just doesn't have the same feel that the others do, at least to me. So I think I'll say that #3 is my favorite. 

Thursday, November 30, 2017

Panel Progress

The last of the new pushbutton panels has been installed, or at least those that are in the railroad room. Both the west end and east end staging panels, which are out in the crew lounge, will be replaced at some point. But for now, I'm declaring victory!

The photo below shows the new panels at Hollister Yard in North Pierce.


Replacing the old panel was a bit of work as three new RCS cards needed to be installed and wired. Additionally, electronic DPDT switches had to be installed to route power to the frogs as most of the turnouts in the yard are still controlled by Hankscraft motors. But it was worth the effort- compare the photo below of the old panel with the one above.


The new panels are significantly smaller than the old one which allowed me to cut back the shelf. This in turn provided a little more room in the aisle in this area. The difference is evident in the photo below.


And while all of this was underway, I took some time to do some additional scenery work. The photo below shows the west end of the Nelsonville engine terminal with the ballast work completed and some additional details added.


And the biggest scenery project- completion of the ballasting in the engine terminal at North Pierce- can be seen in the photo below.


There will be a separate post on the work that's been done here, but for now, its back to weathering some freight cars and finishing another GP9. And finishing up the last op session. And weathering and installing the chain link fence at Brewer Coat in Big Chimney. And...

Sunday, November 5, 2017

Wheels of Time Lumber Load- Part 3

More progress has been made on the Wheels of Time lumber loads. After the Rust-Oleum paint that was applied in Part 2 had dried (see this post for more info: https://cwerailroad.blogspot.com/2017/10/wheels-of-time-lumber-load-part-2.html), I applied Dullcote to all of the loads. Once the Dullcote was good and dry, it was time to weather the loads. I used a wash of tube acrylic ivory black with a small amount of burnt umber added. The idea was to tone down the paint slightly and add some depth. I had also hoped the wash would help show some of the grain in the wood. Here's a photo of the completed loads.


The photo below shows a comparison between the weathered portion of the load and the original paint. It also shows how I cheated and weathered only those areas that would show.


The next step was to add color to the ends of the stacks. I used Americana Tuscan Red acrylic craft paint and here's the bottle.


I dipped the end of a small brush into the paint until I had just a little bit of paint on the very end of the bristles. I then wiped the brush on a paper towel before drybrusing the ends. Once the ends were finished, I lightly drybrushed the sides and tops to represent overspray.

Next up, it's time to start final assemble! Stay tuned.

Friday, October 20, 2017

C&O 5530 on the K&LE

An old Baldwin AS-616 in Chesapeake & Ohio colors has been spotted on the Licking River Terminal Railroad. The LRT is jointly owned by the C&O, L&N, and Kanawha & Lake Erie. Here's a statement from K&LE CEO John Miller:

 
The Licking River Terminal services Newport Steel as well as a coal to barge transfer on the Licking River and operates the bridge over the Ohio River  to connect with Cincinnati railroads.  LRT is owned by the three railroads which connect with it: L&N, C&O and K&LE.  These roads provide the majority of rolling stock to operate the property although a few items are owned by Newport Steel a subsidiary of Davies Steel.

L&N has provided some RS-3's and K&LE has provided an RSD-5/RSD12 set as well as several switchers.  C&O to date has not provided any motive power.

After some pressure, C&O donated a Baldwin AS-616.

Hearing the news, the C&O Historical Society asked if they could restore the paint to original C&O colors after mechanicals were done. The parties agreed and vowed to operate the unit in these colors until it may become necessary to alter them for upkeep etc.

So here is the freshly delivered Baldwin along with the volunteers who did the restoration.  It is posed outside the LRT engine house in Wilder , KY.

After a few weeks of harsh mill service, I would suspect that the unit will look quite a bit different.

John Miller CEO of K&LE RR and board chairman of Licking River Terminal


Friday, October 13, 2017

Surgery

No, not that kind. I'm talking about hardshell surgery. Yesterday, four of the new Exactrail P-S 7315 waffle side boxcars arrived- two decorated for the NW and two undecorated kits that will be painted and lettered for the home road. These cars will make a great addition to the auto parts trains on the railroad. The two NW cars are shown in the picture below.


Just after I ordered them, I wondered if they were going to be able to negotiate some of the tight clearances on the layout. There is one tunnel portal in particular that has caused problems with oversized equipment in the past. The intermodal flat in the photo above wouldn't get through it, and I began to think that the new boxcars wouldn't make it either.

Sure enough- the new cars hit the inside of the tunnel roof at the east end of Nelsonville. The portal is on a curve and it wasn't elevated enough to provide clearance for extra height cars when it was first installed. The problem is on the inside of the curve at the back of the portal where the arched roof interferes with any excess height cars. The photo below is looking east along the main line at the portal.


I had looked at ways to modify this in the past, and there just didn't seem to be any good options. Leaning over the layout with a small saw and reaching into an area I couldn't see wasn't going to work. And going in through the large foam panel that is to the right of the portal would require the removal of a large patch of trees and even then wouldn't provide a good angle to get at the back of the tunnel roof.

Then last night it hit me- do a little targeted surgery! The offending corner is just under the hardshell right inside the tunnel. If I removed a couple of trees, I could probably make a small hole that would be large enough to remove the corner of the tunnel liner. The picture below shows the incision, so to speak.


And in the photo below, you can see where the corner of the tunnel roof has been cut back.


The hole has already been covered with a couple of pieces of plaster cloth and I'll apply a coat of Structo-Lite tomorrow. After a little green paint, I'll reinstall the trees and viola- the new boxcars- and the intermodal flat that wouldn't clear the tunnel liner- will be ready to move freight! 
 

Sunday, October 8, 2017

Wheels of Time Lumber Load- Part 2

Progress continues on the Wheels of Time lumber load that arrived recently. As I assembled the individual bundles, I stacked them on a Proto 2000 flatcar. Once I was satisfied with the appearance of the load I made some notes about how it was stacked. The photo below shows the notes.


Next, the loads were all washed in preparation for painting. After handling each of the individual loads during assembly, which included filing off the small amount of flash on the ends from the spues, I wanted to remove any dirt and/or oils from my hands. The photo below shows the washed loads.


I went to Home Depot to find a rattle can color that I could use to spray the loads. I had originally intended to just spray the bottoms with the can and then use my airbrush for the tops and sides, but the test load turned out so well that I'm going to use the rattle can for the entire project. Here's the paint I found.


The photo below shows the color on the test load. This paint has a slight sheen to the finish. I'll give everything a coat of Dullcote prior to applying some acrylic washes to add some depth and color variations. Also note that the instructions say the best adhesion to plastic is achieved after allowing the paint to cure for five days.


So far, so good. I think the color will work well with some very light weathering. And the detail on the loads is impressive, from the grain on the boards on top to the variations in the ends and sides. More to come on this project.

Tuesday, October 3, 2017

Another one for the display case.

With the recent completion of two more Northeastern style cabooses, there are finally enough cabooses on the railroad to supply all of the trains and have a few left on the caboose tracks at North Pierce and Nelsonville at any point in time. The new additions have also allowed me to retire the only bay window caboose on the railroad. It's been a long time in coming, and I tried to retire it once before. But the addition of a few new trains caused it to come back into service. Now, finally, it's headed to the display case.

The inspiration for this caboose was the CA-11 kit-bash that Eric Brooman did for the Utah Belt many years ago. An article appeared in the July 1983 Railroad Model Craftsman in which he detailed how he constructed his cabooses using Athearn's Blue Box bay window caboose. I had completed three extensive modifications of Athearn's wide vision caboose by this time and had decided that the most modern cabooses on the railroad would be of the bay window design. And this would fall in line with what the Chessie System had done in the mid-1970's.

I started by removing all of the cast-on detail from the shell. Next, I salvaged windows from a few of the wide vision shells and inserted them in the bay window shell. I wanted a unique design and changing the windows, in the same fashion as I had done on the wide vision cabooses, seemed like the ticket. Most of the original windows were filled with scraps of styrene and sanded smooth. Unfortunately, I didn't spend as much time with the Squadron Green putty as I should have and you can see some of the joints.


I fashioned new end railings out of brass wire and pieces of plastic and added wire grab irons all around. Additional details were added to bring the car up to the standards of the other cabooses.


Alas, this car was completed at a time when I was really struggling to get a good gloss surface with my airbrush. As a result, the decals are a mess. The numbers didn't turn out too bad because they are dry transfers. 

I never really warmed up to the overall design of this caboose, and given the decal job, I'm happy to be relegating it to the display case. Who knows- there may yet be a modern bay-window caboose on the roster as I still like the concept. But for now, I'm waiting for the inspiration to come around like it did the last time. 

Thursday, September 21, 2017

Wheels of Time Lumber Load

Last week, I stumbled across a post on Model Railroad Hobbyist's Facebook page about an offer of a sprue of Wheels of Time's lumber load. Simply sending an e-mail request to Wheels of Time would get you one sprue of their new lumber load, and the best part was that it was free! So I sent an e-mail early in the week (maybe Monday?) and on Thursday the sprue arrived in the mail. Not only was the product free, but the service was quick, too. (Sorry- the offer has now expired)

Below is a picture of the sprue along with the small lumber load already put together.


The sprue contains one each of 8', 10' 12' and 14' loads along with vertical stickers to separate the loads. The photo below shows a close-up of the assembled load 8' load.


There is minimal flash on the pieces and they snap together and fit perfectly. There are complete directions along with detail on prototype loads (and photos) on the Wheels of Time website. Here's a link: http://www.wheelsotime.com/ho-scale-lumber-load/. I plan to paint the loads a lighter color to more closely resemble new lumber and then add the straps per the instructions.

This is a really nice product, very cleverly designed and well thought out. And what a  great way to get people to sample the product! Kudos to Wheels of Time for the neat lumber loads and the innovative advertising campaign. And yes, I have already ordered some for the flat cars on the railroad that have been running around empty for what seems like forever.


Saturday, August 5, 2017

Retired

SD9 1774 has finally been retired. A recent change in motive power assignments at North Pierce has enabled the railroad to put this old work horse out to pasture. The unit is shown below after its last run on BC-11, also known as the Big Chimney Roustabout. 


This engine was purchased in sometime in the late 1970's. I spent a considerable amount of time scraping off cast-on details and replacing them with finer parts. New handrails were crafted from .012 brass wire. It was the second diesel painted for the railroad and the second one to be painted in the original "Central Belt" scheme. For more on the CWE locomotive paint schemes, see the July 2016 issue of RMC. At some point along the way, probably in the mid-1990's, I finally got around to re-numbering the unit. The original Railroad Roman numbers were painted over and it was renumbered into the 1700 series.


It wasn't until operations began on the railroad in 2012 that I considered adding a decoder. This engine was paired with another SD9 and was intended for use on the Big Chimney Roustabout, which works out of North Pierce. There aren't any significant grades on this run so one powered unit is all that is really necessary. This old workhorse still had the original Athearn motor in it. Rather than rebuild the chassis, I elected to turn this engine into a sound-only dummy. I removed the motor, replaced the jewel headlight lenses with clear ones, and added a Tsunami and a speaker. The unit performed well in this capacity, although the deep flanges on the original Athearn wheels liked to talk a lot over the hand-laid turnouts.


So 1774 is off to the drawer where a handful of other equipment patiently awaits the display case that will be built some day.