Showing posts with label Scenery. Show all posts

Friday, April 10, 2020

More Details- 1

About a month or so ago, I assembled and painted 12 of the Micro Engineering switch stands. My latest trick is to drill the stand for the target and then glue the target on using canopy glue. When, and not if, the stand gets bumped, the target will fall off the machine. In the past, I used two-part epoxy to glue the targets and when they got knocked off, the base of the target broke off. The canopy glue is weak enough that it won't stand up to a good bump, and as an added benefit, it dries clear.

So with some extra basement time these days, I decided to put together another batch. The photo below shows the stands installed at the west end of Hollister Yard. 


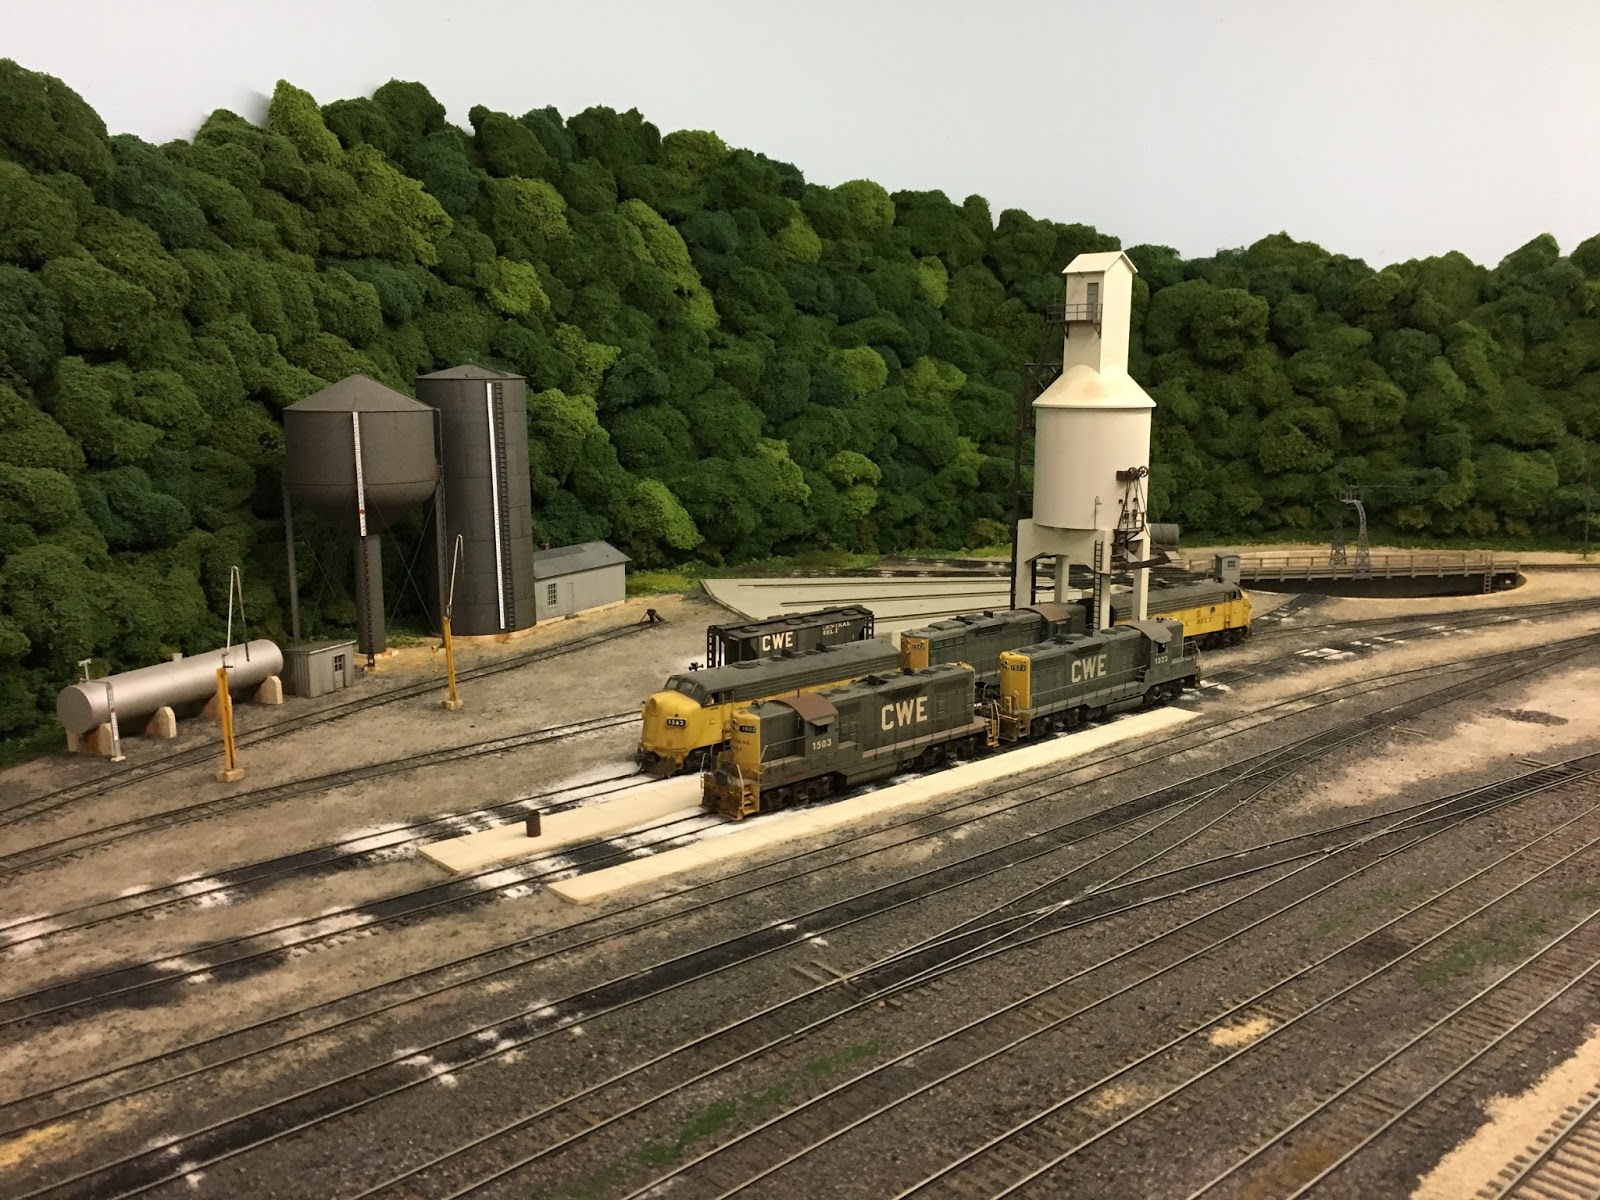
The next photo shows them installed on the leads to the engine service area and the coal yard. These are Details West switch stands which have a slightly smaller target. 


With the addition of these last few switch machines, all of the turnouts in Hollister Yard are now properly marked.

I had a few left over after finishing Hollister Yard so I installed them at the east end of Nelsonville, as can be seen in the photo below.


The past several times that I have staged the Laurel Ridge prep plant at Summit Springs, I have noticed that it's difficult to see where the points are for the first turnout to the mine. I started using a piece of foliage that sticks up right at the points as my "marker" for knowing when I had cleared the switch. I know that this was often done by crews on the real railroads, and there's a classic tale of an engineer shoving a cut of hopper cars off the end of a tail track because someone had cut down the large bush that he used for knowing when to stop shoving. At the Laurel Ridge plant, it occurred to me that I could install a high switch stand that would be visible above the foliage. The photo below shows the Central Valley switch stand that now marks the points.


And here's a view more typical of what the crews see when working the mine.


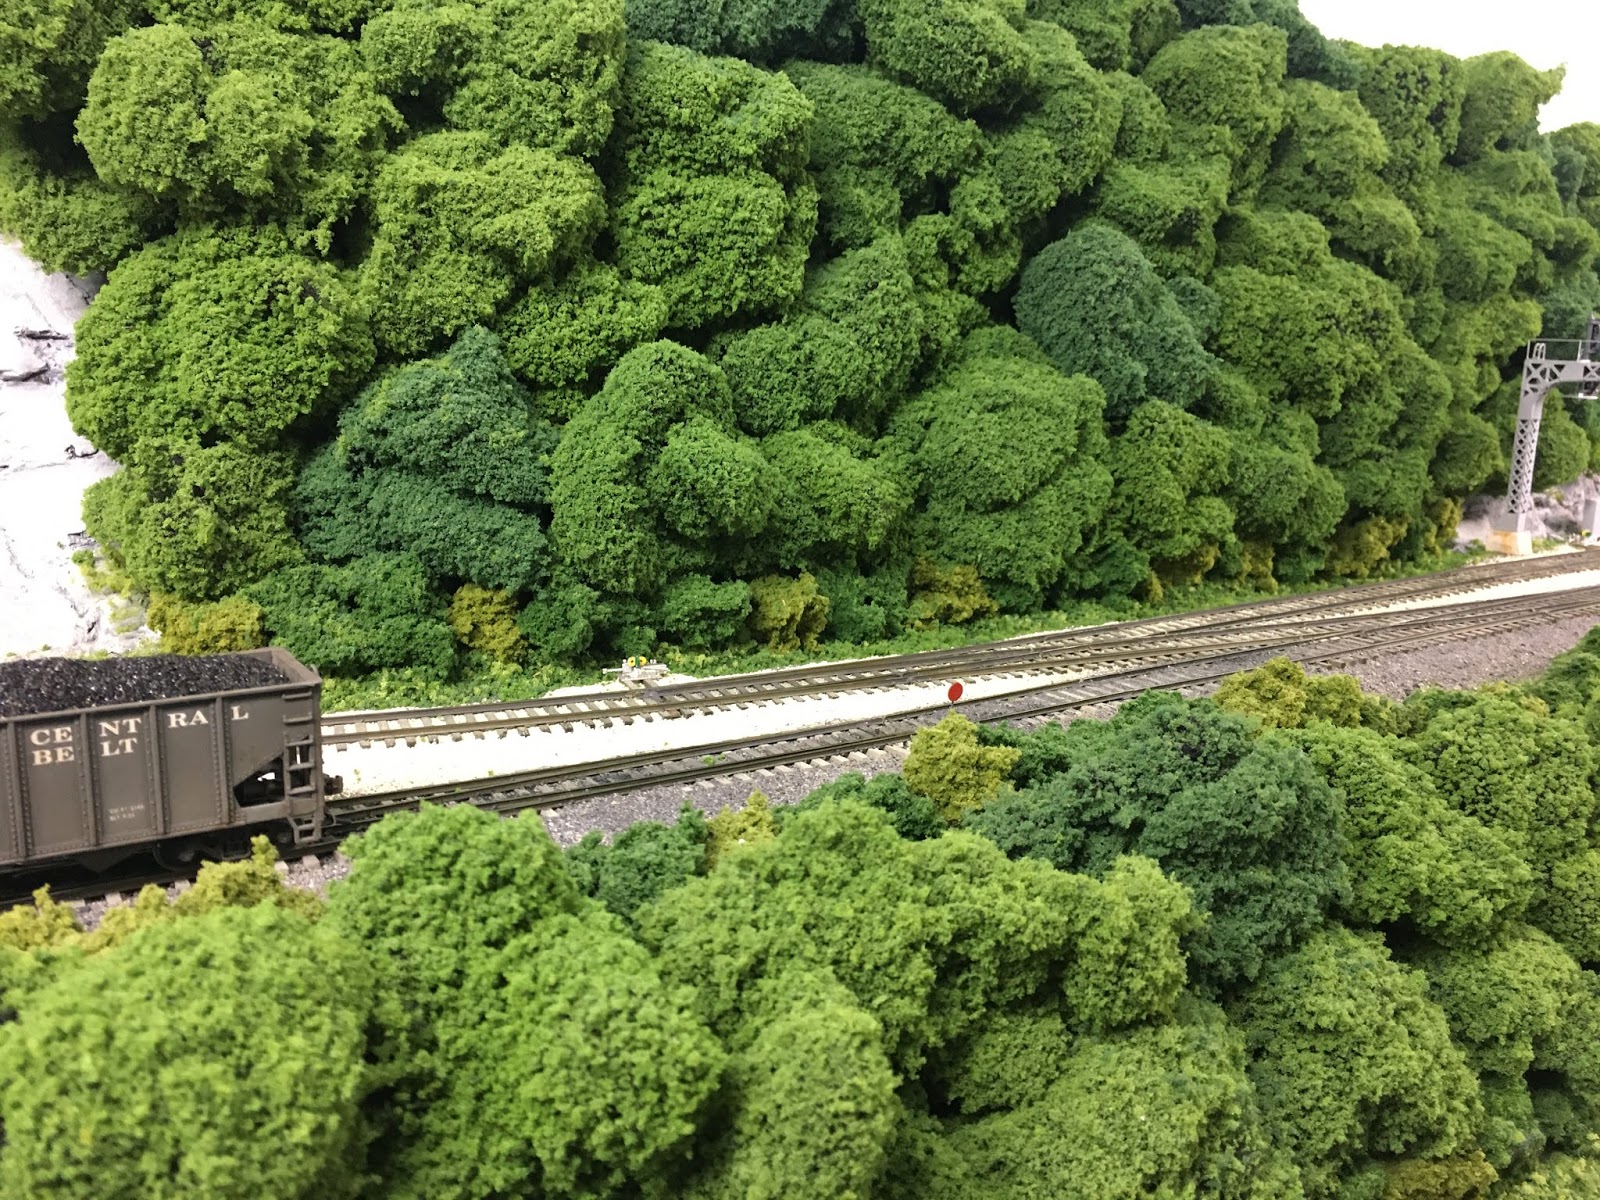
Hopefully, the new target will make working the prep plant just a little bit easier.

Monday, February 12, 2018

The Engine Terminal at North Pierce- Part 1

Last fall, work began in earnest on the ballast and track in the roundhouse area at North Pierce. There was one primary catalyst for this and it was a picture taken by Neil Schofield of the engine terminal on his CP Rail Vermont Lines. I believe the photo appeared on the MRH Forum at some point and it's shown below.


Neil does incredibly beautiful work and you can find a number of wonderful videos of his railroad on YouTube. But what caught my eye in this photo was the ballast. Note the fine texture and the colors- absolutely typical of what you would have found at just about any engine terminal in the 1970's. And it occurred to me that you could achieve this look using tile grout and some paint. So I thought I'd give it a try. I have an old piece of Homasote with ties and rail on it that I used to develop the sand colors that are used on the grade heading up the hill from Big Chimney. It could serve as the perfect test bed for the new ballast. The photo below shows the results.


The ballast is grey grout and I used black poster paint to represent spilled oil and grease. I was pleased enough with the results that I decided to forge ahead. But first, the radial tracks needed some attention. Feeders had to be run to the rails and then routed through the new panel so that power could be turned on and off. And I had never re-programmed the NYRS PT Model III controller after the radial tracks were installed. So some work was required to make everything operational before the ballast was put down. The photo below shows the panel for the engine terminal with the on/off track power toggles along with the new instructions for operating the turntable.


Once the mechanicals were all in order, ballasting began. I used grey tile grout along with a 50/50 mix of grey and white grout. I applied the grout with a plastic spoon and then went back over it to smooth it out. I applied the sand in various areas and concentrated a bit of it around where the sanding tower will eventually be. An application of 70% isopropyl alcohol followed by a 2:1 mix of wet water and white glue followed and fixed everything in place. The photos below show the area once these steps were complete.


The grease and oil was added using black poster paint. This paint is water soluble and can be used straight out of the container or thinned to get various washes. 

As I was working on the ballast, I started thinking about the roundhouse again. I purchased the Walthers three stall engine house many years with the thought of incorporating it in the engine terminal at North Pierce. As can be seen in the photo above, the base was installed when the radial tracks were laid. So I had to either use the kit, scratch-build something to fit the base, or leave just the foundation. I was tempted to just leave the foundation as there were many instances in the 1970's of roundhouses being torn down while the tracks remained in service. But there was another photo that had been working on me, and it was driving me toward using the roundhouse.

There are a number of photos of the various structures in the engine terminal at Hinton, WV on the C&O that were taken by Bill Simonson. His website contains a wealth of information about this location along with many scale drawings of the various structures. The photo that captured my attention, however, can be found here: http://hinton.cohs.org/photos/image0078.JPG. I printed this picture out on a piece of 8 1/2 x 11 paper and kept it on my desk for several months. I began to think that I might be able to capture the essence of the colors and came up with some ideas about how to achieve them. In Part 2, I'll describe the trial and error process in detail.

Friday, December 29, 2017

The End is Near...

No, not the end of the world. And the title doesn't even refer to the end of 2017 although that is rapidly approaching. It's the end of the poly fiber trees that is near. Over the past week or so I finished covering the Styrofoam lift-out behind the engine terminal at North Pierce. I waited to cover the lift-out until all of the tracks were operational in service area and the ballasting and scenery was finished. The photo below shows how this area has looked for a long, long time.


And the photos below show the results of the recent work.


A quick observation about the light green colored trees- that color will fade over time. I assume it's due to the fluorescent lighting, but it has happened all over the railroad. The colors all fade slightly and end up with a subtle variation that works well in my environment. Also, there will be another post soon on how the engine terminal was ballasted and the momentum is has provided for structures in this area.

So after what feels like fifty years and tens of thousands of trees, there is only one, small stretch of hardshell that remains to be covered. The photo below shows the hillside by the to-be-built Austin Coal tipple in Nelsonville. While I'm close to the design of the structure, it hasn't been finalized yet. And I want to wait until the plans have been developed before I start scenery in this area.


While a large number of projects remain to keep me busy, and as we all know, a railroad is never finished, for the very first time it has begun to feel as though the layout is approaching the point where it is largely complete. And that means it's time to seriously start planning for the expansion into the crew lounge. Stay tuned.

Saturday, December 16, 2017

Photo Fun

As I walked out of the railroad room the other night, I saw DC-15 out of the corner of my eye. The train is in the process of being re-staged at Nelsonville and it looked like it might be a neat photo opportunity. So this morning I grabbed the camera to take a few photos.

The photo below is the shot that I initially thought would be the best. It's a view across the leads to the engine terminal.


While I like the perspective and the detail in the photo, the train that was supposed to be the focus of the shot is too far away. So I tried another angle.


This photo keeps most of the detail but brings the loco a little closer. Still, it wasn't quite the shot I wanted. So I changed the angle just a bit and zoomed in a little closer.


This one is much closer to what I had seen in my minds eye when I first thought of the photo opportunity. But just for kicks, I thought I'd shoot it from a slightly different angle.


While you can see the locomotive much better with this angle, it just doesn't have the same feel that the others do, at least to me. So I think I'll say that #3 is my favorite. 

Thursday, November 30, 2017

Panel Progress

The last of the new pushbutton panels has been installed, or at least those that are in the railroad room. Both the west end and east end staging panels, which are out in the crew lounge, will be replaced at some point. But for now, I'm declaring victory!

The photo below shows the new panels at Hollister Yard in North Pierce.


Replacing the old panel was a bit of work as three new RCS cards needed to be installed and wired. Additionally, electronic DPDT switches had to be installed to route power to the frogs as most of the turnouts in the yard are still controlled by Hankscraft motors. But it was worth the effort- compare the photo below of the old panel with the one above.


The new panels are significantly smaller than the old one which allowed me to cut back the shelf. This in turn provided a little more room in the aisle in this area. The difference is evident in the photo below.


And while all of this was underway, I took some time to do some additional scenery work. The photo below shows the west end of the Nelsonville engine terminal with the ballast work completed and some additional details added.


And the biggest scenery project- completion of the ballasting in the engine terminal at North Pierce- can be seen in the photo below.


There will be a separate post on the work that's been done here, but for now, its back to weathering some freight cars and finishing another GP9. And finishing up the last op session. And weathering and installing the chain link fence at Brewer Coat in Big Chimney. And...

Friday, October 13, 2017

Surgery

No, not that kind. I'm talking about hardshell surgery. Yesterday, four of the new Exactrail P-S 7315 waffle side boxcars arrived- two decorated for the NW and two undecorated kits that will be painted and lettered for the home road. These cars will make a great addition to the auto parts trains on the railroad. The two NW cars are shown in the picture below.


Just after I ordered them, I wondered if they were going to be able to negotiate some of the tight clearances on the layout. There is one tunnel portal in particular that has caused problems with oversized equipment in the past. The intermodal flat in the photo above wouldn't get through it, and I began to think that the new boxcars wouldn't make it either.

Sure enough- the new cars hit the inside of the tunnel roof at the east end of Nelsonville. The portal is on a curve and it wasn't elevated enough to provide clearance for extra height cars when it was first installed. The problem is on the inside of the curve at the back of the portal where the arched roof interferes with any excess height cars. The photo below is looking east along the main line at the portal.


I had looked at ways to modify this in the past, and there just didn't seem to be any good options. Leaning over the layout with a small saw and reaching into an area I couldn't see wasn't going to work. And going in through the large foam panel that is to the right of the portal would require the removal of a large patch of trees and even then wouldn't provide a good angle to get at the back of the tunnel roof.

Then last night it hit me- do a little targeted surgery! The offending corner is just under the hardshell right inside the tunnel. If I removed a couple of trees, I could probably make a small hole that would be large enough to remove the corner of the tunnel liner. The picture below shows the incision, so to speak.


And in the photo below, you can see where the corner of the tunnel roof has been cut back.


The hole has already been covered with a couple of pieces of plaster cloth and I'll apply a coat of Structo-Lite tomorrow. After a little green paint, I'll reinstall the trees and viola- the new boxcars- and the intermodal flat that wouldn't clear the tunnel liner- will be ready to move freight! 
 

Saturday, December 24, 2016

December Update

Well, 2016 is rapidly coming to an end. I haven't posted nearly as often this past year as I had originally intended. Perhaps that will change next year. In any event, here's an update on what's currently under way on the railroad.

First up is GP9 1824. This is a Proto 2000 shell on an Athearn Genesis chassis with a factory installed Tsunami. This Genesis loco was one of the early GP9 runs that had the wrong window height and errors in the height of the doors on the long hood. Good friend Anthony Hardy alerted me to a sale in which these locos were going for $135 which isn't a whole lot more than the cost of the decoder. The detail on the underframe, fuel tanks and trucks is outstanding. All I had to do was cut out the coupler pockets on the frame and mount them on the body.


The chassis was just finished on another GP9 while the body is in the paint shop. The CWE locomotive roster included a large number of GP9s which were part of the original dieselization of the railroad. Until the completion of 1824, there was only one on the railroad. In addition to this next one, there is another currently in the works.


Two more panels have been converted to pushbutton control since the last post.


Next up is the panel at Nelsonville. This project will take a little longer to complete as the panel will have two signal repeaters- one for the signal off the Dry Creek Branch and the other for the westbound main signal. Neither of these can be seen from the aisle.

The ballast in the east end of Nelsonville has been finished. Some additional weathering around the switches and the installation of switch stands will wrap up the scenery here. I won't finish the track closest to the fascia until the structures are built for this area. The old coach serving as a yard office will be replaced with a structure similar to the yard office at Elk Run on the C&O. There will be several track worker shanties and a RIP shed here as well.


The paint shop is full of cars awaiting some weathering. Included in this group is a special car from the Suffolk Northern. More to come on that project.


And last up is a PRR X58 boxcar that was just added to the roster. This is one of the new Tangent cars and, in the spirit of the season, it's "a beaut."


Here's wishing you a very Merry Christmas and a great 2017!