The house with a thousand pieces is finally finished. After installing the porch railing and screen door, I built the roof over the porch. The last step was adding the steps and railing.
Some bushed and weeds were added around the base of the structure once it was planted in place.
Once the scenery in the foreground in the shot below is finished, I'll be able to shoot this next picture from a higher angle and eliminate the ceiling in the background.
This little house sure took an awfully long time to finish. But it's exactly the structure I wanted at this location and I've wanted to build it ever since I first saw it in the photo of the Clinchfield U36C. It's great to finally have it done.
Over the last year or so, I've picked up a number of used freight cars at Tim Trains and Hobbies in Northern Kentucky (http://www.timstrainsandhobbies.com/). Most of these cars are either Atlas or Athearn Genesis and the detail and craftsmanship is remarkable. Several of the cars are new for my era with build dates of 1975 or so. I want to keep a balance between the older, more weathered cars in the fleet and some recently built cars and these certainly fit the bill. The trick is to make them look like they've been in service for a brief period of time by removing the glossy "model" look.
The first step is to tone down the glossy finish and I gave each of these cars a coat of Testor's Dullcote first. Once that dried, I came back and slightly faded the paint with a very thin coat of Vallejo Model Air Aged Concrete. This color has become my new "go to" color for fading now that Floquil Grime is no longer available. Once the fade is dry, I gave them one last coat of Dullcote.
For the BN car, I added an ACI label based upon the prototype photo below that's on the Fallen Flags website (http://www.rr-fallenflags.org/).
The trucks and wheels were weathered using artist's acrylics and powders and the ends were given a light coat of a mixture of artist's acrylic ivory black and burnt umber.
The roof was given a little more of the Aged Concrete than the sides to show the reflection of sunlight.
CWE 56827 was faded in the same manner as the BN covered hopper and the wheels and trucks were also weathered with artist's acrylics and powders.
This car has a build date of 9-75 so it wouldn't even be a year old in August of 1976. However, given that it's in pulpwood service, it's likely that the deck would have begun to show the effects repeated loading and unloading. I added rust spots using a cosmetic sponge and artist's acrylics.
Last up is Raritan River 458. This car is an Athearn Genesis model and is spot on for the prototype. The Raritan River took delivery of 100 of these cars in 1975 and the build date on this one is 2-75. In addition to the paint fade, I weathered the wheels and trucks a little more heavily than the previous cars using only artist's acrylics.
For the roof, I applied a very thin wash of artist's acrylic ivory black with a tiny bit of burnt umber added. This wash helps highlight some of the detail and adds just a little bit of grime to the surface.
These cars were a quick and easy way to add a few more cars to the fleet. Now that all of John Miller's cars are in boxes, I'm going to have to go back to expanding the freight car roster the old fashioned way... by actually building them myself.
Well, not really, but it certainly seems that way. I started building a house to sit on the hillside at the west end of Nelsonville in December (is it really March already?) and it still isn't finished. It's based upon the house that's in the background of a picture I found on the Internet of a Clinchfield U36C. Here's the picture blown up to show the structure.
With the addition that was added to one side, what appears to be a new metal roof, and the weathering on the boards covering the bottom of the house, I thought this would be a great structure to model. I started by drawing up the basic dimensions of the house using some scale drawings of similar structures and some Grandt Line windows. I also planned to use some of the same construction techniques that I used on the three company houses just west of Big Chimney.
Everything started out fine. I cut the Evergreen board and batten siding for the sides and ends, cut out the windows and door, and built some internal bracing. I next installed the Evergreen metal roof and some .030 sheet sytrene for the section of roof covered in tar paper. And that's when things got interesting.
I realized I would have to paint the side and ends white first and then come back to paint the roof some type of silver color. But before I did this, I wanted to make templates for the foundation sides so I could be working on those while the paint on the structure cured. Which meant I had to do some scenery work where the building would be located. Which meant... you get the picture.
The photo below shows the final contour and ground cover where the house will sit. I had to add numerous layers of plaster to finally get the right look here.
In all fairness, part of the reason this project is taking so long is that there are a number of other projects that I've been working on at the same time. One of them is the house trailer in the photo above and below. It still needs steps and a bunch of additional details, but it is also part of the big push to get this area of the layout completed. Or at least most of it. Or a significant portion of it. Or the area on this side of the tracks...
So with the scenery contour finished and the cardboard templates for the foundation done, I painted the sides and ends of the structure white. This was followed up with a coat of Dullcote in order to protect the base color when weathering the structure. I then masked the sides and ends and painted the roof with Vallejo Model Air aluminum.
I realized early on in this project that I would have to build the foundation pieces separately. There was just no way I would be able to weather them correctly if the pieces were mounted on the structure. So I build frames for the three visible sides and added the individual boards. The photo below shows the back of the front foundation piece.

I used artist's oils and odorless turpentine to weather the boards on the foundation pieces. And once this was complete, I was really anxious to get them mounted onto the structure. After installing the front piece, it occurred to me that it would be really difficult to get the building to sit level once the side pieces were attached. I would need the building to be fairly level in order to be able to get nice, straight brush strokes when weathering the tar paper roof. So I build a small support jig out of wood blocks to hold the building level as shown in the photo below. With the tar paper roof installed and weathered, I was ready to add the side pieces to the foundation. Or so I thought.

With the building sitting on the blocks, it occurred to me that this would be the ideal position from which to measure and build the porch railing. So the side pieces would have to wait. Again. And you can see in the photo above where I had to cut the ridge pieces on the metal roof in order to accommodate the porch roof. Seems like I missed that step when I was building the metal roof.
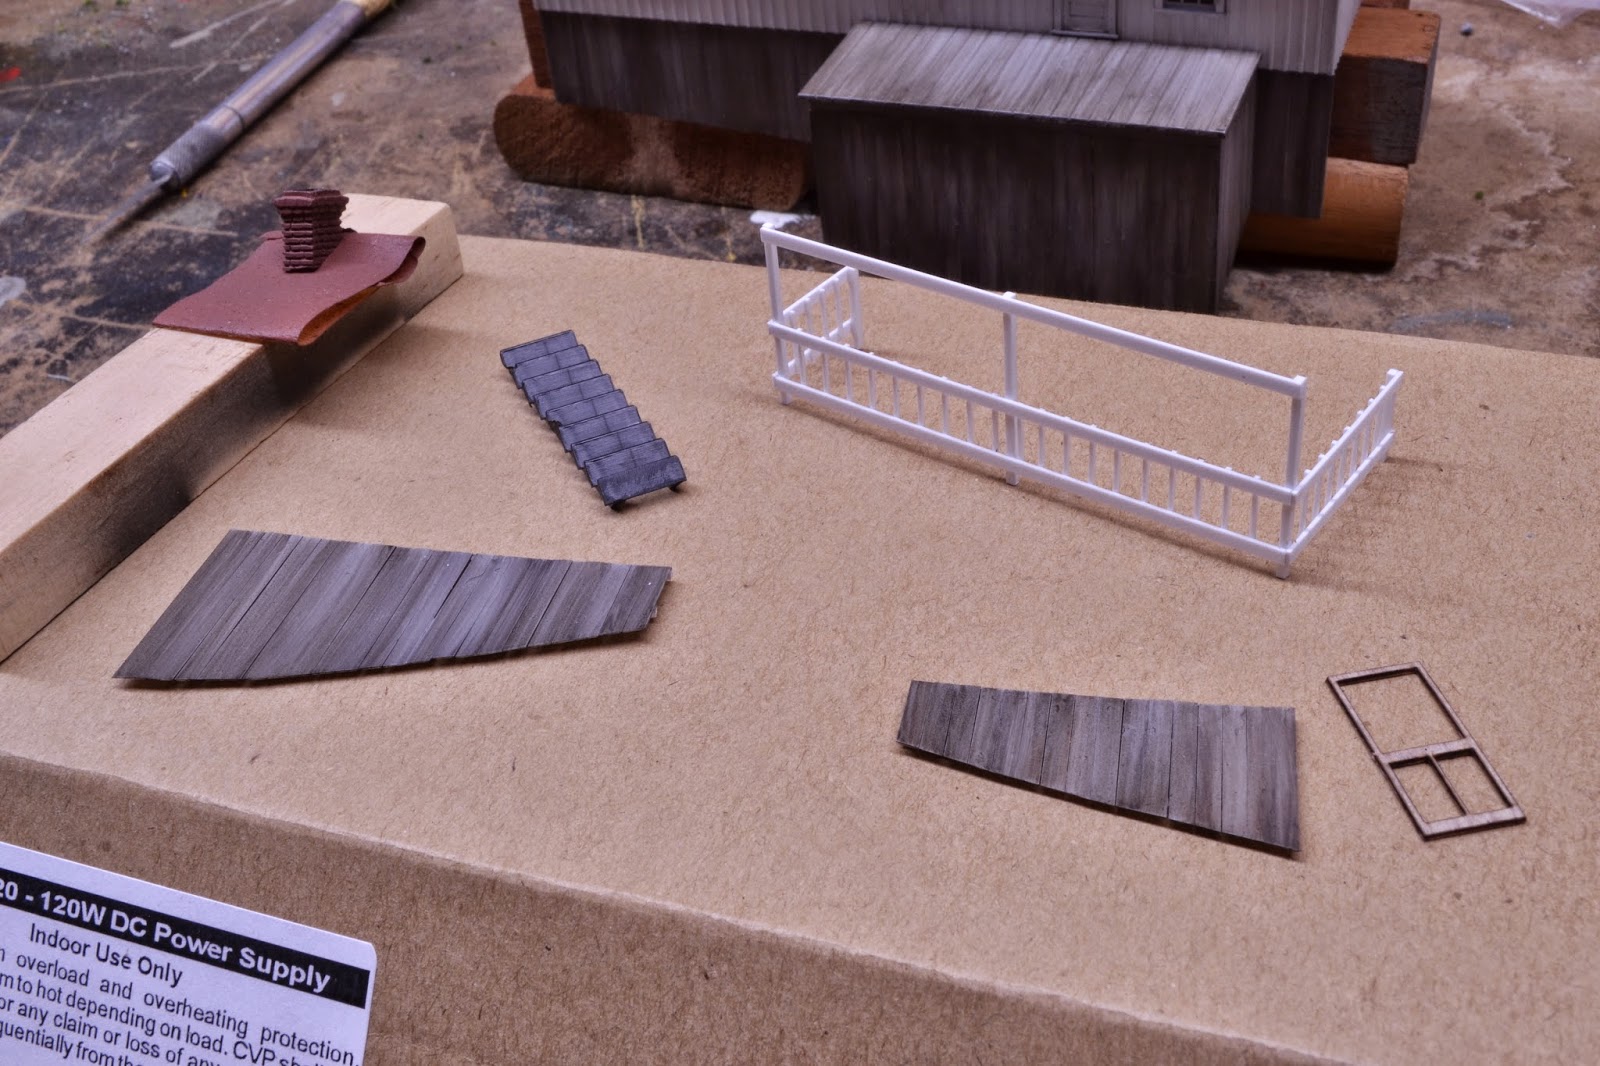
The photo below shows the completed porch railing ready for paint along with the steps, screen door, chimney and foundation side pieces.
At this point, the end appears to be near. It's a good thing I'm not doing this kind of work for a living. At the rate I work, my family and I would have perished a long time ago.