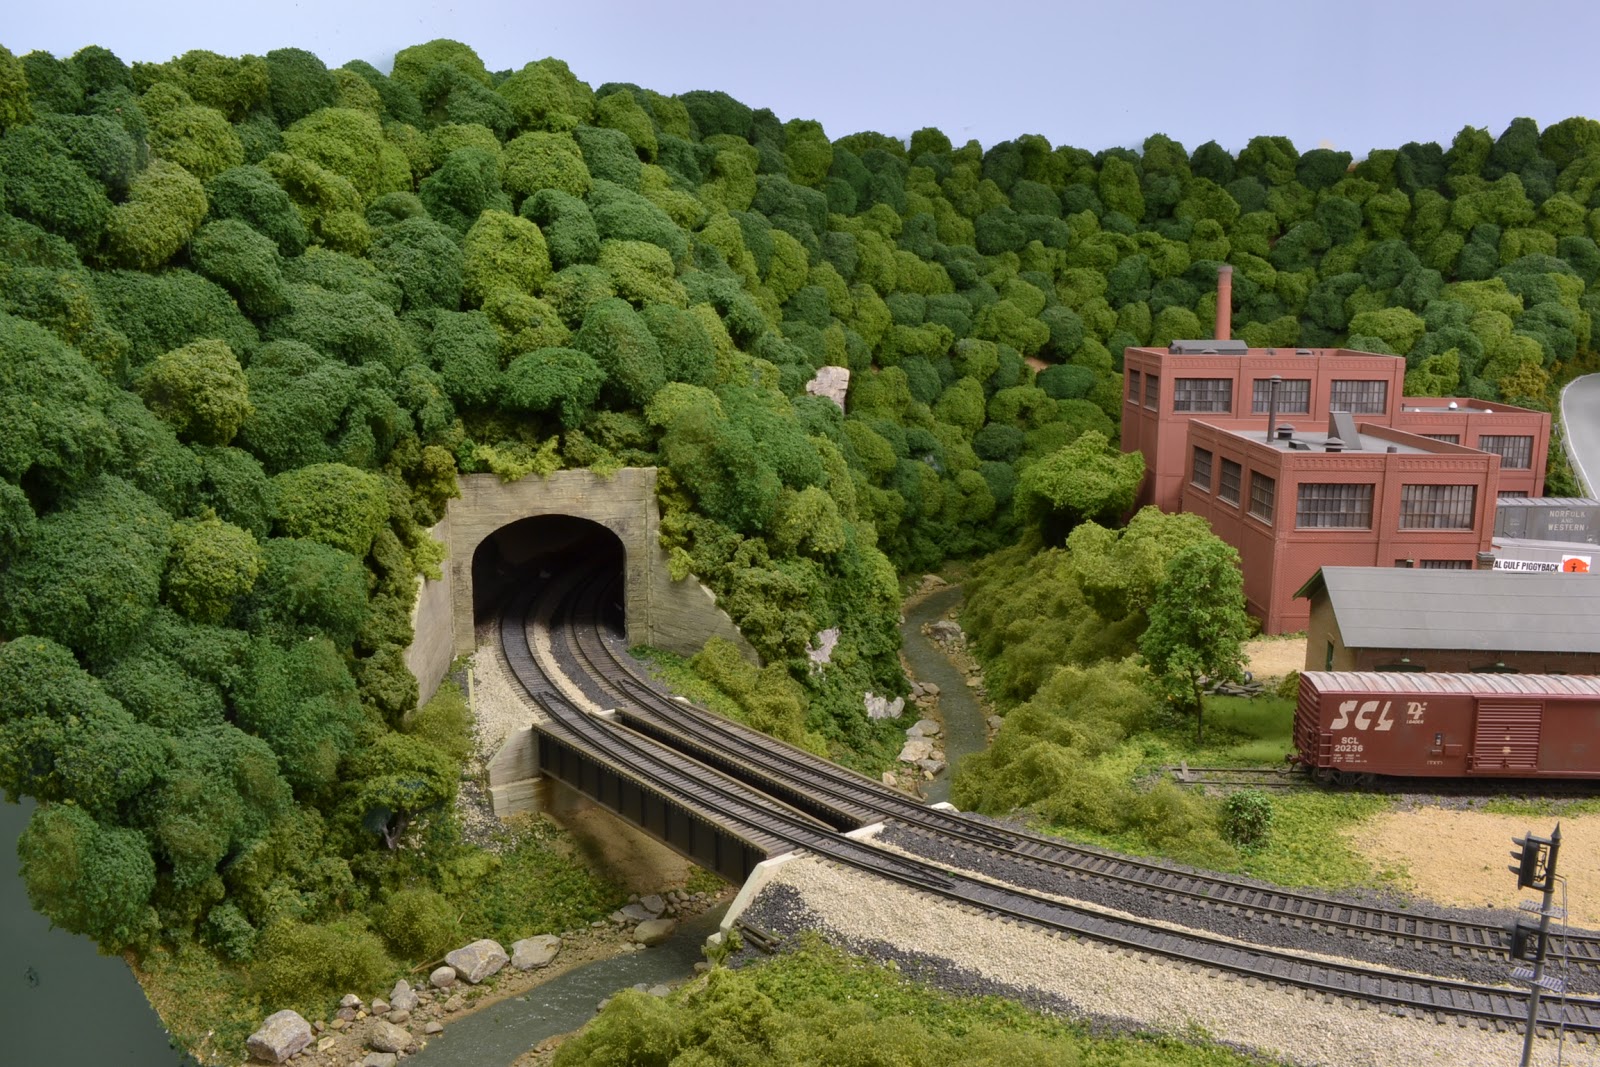
This past week I spent a bit of time working on the modifications to the layout at North Pierce. In the first photo you can see the first section of new hardshell and the trees that have been replaced in this area. As I have mentioned before, the trees on the hillside here were part of the first scenery completed on the layout. Some were left over from my first layout, and at the time I was only using two colors of ground foam for the foliage. This looked OK initially, but really looked bad in photographs.
The second photo shows the new track in this area, all of which is operational now. I added cardboard to the sides of the hole in the drywall to keep any dust from getting on the track. I painted the cardboard, the Homasote, and the plywood with black poster paint in order to make it less visible from the tunnel entrance.
In the photo below you can see the location of the new bridge on the mainline. Once the tunnel portal is weathered and in place and the bridge and abutments have been added, I'll finish roughing in the scenery in this area.
It's good to have all of the demolition behind me- I hate the mess that it creates. And I'm really looking forward to seeing the first train come through the tunnel heading eastbound!
From the time I developed the concept of the Chesapeake, Wheeling & Erie Railroad, it was always my intent to have F units on the roster. In fact, the fourth engine I built for the CWE was an old Athearn F7 A unit. A number of years ago, I ordered two BLI F units- an A and a B- both with sound. I built the B unit first, and it sat as a lone unit for some time. Both engines had early versions of QSI decoders in them, and I was never happy with the sound. Once I began operating the layout, it seemed like it was time to build the A unit and pair it up with the B and a GP7 or 9 for mine run service. This past fall I finally finished the A unit and replaced the decoders in both F units with Soundtraxx sound decoders. Even the earlier versions of the Soundtraxx decoders sound much more like an EMD 567B than the QSI decoders. The units ran through two operating sessions before finally getting the final weathering. Now both units are finally finished, and here's the result:

In the photo above, F7A 1563 and F7B 1572 are shown at the engine terminal in Nelsonville. In the photo below, the units are rolling off the Dry Creek Branch and onto the main line heading west.
In the next shot we catch the trio coming off the bridge just before Cedar Falls Junction.
After passing through Cedar Falls Junction, the trio of units stops on the truss bridge over the main line at Big Chimney while the brakeman aligns the switch for the Sand Fork Branch. A westbound coal train sits in the hole at Big Chimney beneath the bridge.
After picking up the brakeman, the three units head out across the bridge that will take them up the Sand Fork Branch to serve the various tipples located along the line.
With the sunlight fading quickly, we catch one last glimpse of the trio as they pass the station sign at Irma, WV.
On the workbench are two more F7A's, and these units will round out the F unit fleet on the layout. Both engines are Intermountain shells on Stewart chassis with Kato drives, and both units have Tsunami's and high bass speakers installed. I'm anxious to get these two on the layout to hear the Tsunami's!
Over the past year or so I've made references to the new west end staging yard and the scenery that is going to be re-done at North Pierce. Well, the process has begun. The photo below shows the first load of lumber for the new staging yard. It will be a 12 track, stub-ended yard and will run along the wall on the right hand side of the photo back to the stairs.
The next photo shows where the yard throat will curve toward the layout room, the entrance to which can be seen toward the upper left hand corner of the picture. Also visible in the photo is the lift-out section across the sliding glass door that carries traffic from the layout room on the left to the 12 staging tracks on the shelves to the right.
This past Friday I finally got the motivation to start on the project. in just under two hours, almost all of the initial scenery removal had been completed. Below are the before and after shots of the area.
As you can see from the photo above, the first thing I found when I removed the drywall where the line was going to go through the wall was a stud. I'd forgotten how much fun this part of layout construction can be. At least it wasn't a water pipe. After reviewing the plan for the turnouts in the yard throat that had already been drawn, it became apparent that I could push the entire throat back several inches without any problems. This meant I could move the entrance to yard several inches to the right and avoid taking out a section of the stud. This isn't a load-bearing wall so removing a portion of the stud wouldn't have had any impact on the structural integrity of the house, but I wanted to avoid this if possible. The photo below show the new approach to the staging yard.
.JPG)
The main line will cross a 50' deck girder bridge over a small stream that will curve around and disappear behind a hillside that will be in the middle of the photo. The photo below shows how the main line will curve slightly after crossing the bridge as it enters the staging area in the other room.
The slight curve will actually make it more difficult to see through the tunnel, an added benefit as there will be no scenery on the other side. The arrangement has worked out much better than I originally anticipated. If I can't be good at this kind of planning, I'll take being lucky! And with a little additional luck, I might even have some new staging track in place by the next operating session.
Over Christmas I received a special boxcar. Santa Claus (in the form of John Miller) gave me a 50' double pludoor boxcar painted for his free-lanced Kanawha & Lake Erie along with a set of home road decals. He also included loading destination information for waybills based upon the industries that his railroad serves. Below is the completed model ready for the next op session.
Thanks again, John.
Yesterday morning I went down to the layout to spot a few last cars prior to the afternoon operating session. As I began to move a consist of F units and a GP9, I noticed that an SD9 in the engine service area was moving slowly. I keyed in the loco's address to my throttle and tried to get it to stop. It wouldn't. So it was off to the programming track in an attempt to re-acquire the address. While trying to sort this out, I noticed that the lights were going on and off intermittently. I finally figured out that another throttle was plugged in with the SD9's address and the knob was turned slightly past the off position. But by this point the flickering lights were really bothering me and I realized the unit wasn't going to make the operating session. So it went to the workbench to get a new decoder, which I had planned to do at some point anyway as I want all of the diesels to have Tsunami sound or the compatible non-sound decoders from Soundtraxx.
As I took the SD9 apart, I thought about adding sound to it. I want all consists on the layout to eventually have sound, and this unit had been running solo on a local. I had planned to have two SD9's running together eventually, so I decided to check on the new one Proto 2000 units that have Tsunami's. But these units won't be available until next summer. Then I remembered the old Athearn SD9, which I believe they called an SD7, that I had built years ago. I wondered if the discrepancies in the hood widths would be obvious, so I got the old unit out and placed it next to the Proto unit. Not bad, not bad at all. So I decided to add sound to the Athearn unit, which will be a dummy, and pair it up with the Proto unit. But before jumping in and making some major changes to the appearance of the old Athearn unit, I thought I would document the first two diesels I built for my free-lanced Chesapeake, Wheeling and Erie.
The first loco to receive Chesapeake, Wheeling & Erie paint was an Athearn GP7. This engine began life as a stock dummy unit decorated for the SOO, and it's be modified many times over the years. The unit is in the as-delivered paint scheme with the Central Belt logo on the side and small "CW&E" initials in the upper corner of the short hood.
When I first built this unit, I planned to have all-weather windows on all of my diesels. That changed after I had seen numerous photos of coal hauling railroad diesels and none of them had these types of windows. This unit was also numbered in the 4000 series at some point, in Railroad Roman font, but there was no rhyme or reason to the system. Once I decided on a numbering system for the diesel fleet that would more closely reflect each unit's horsepower, I went back and changed the numbering. This unit was completed sometime around 1980.
The second diesel is the Athearn SD9 mentioned above. This unit was completed shortly after the GP7 and hasn't been changed much since. It's still numbered in the original numbering system, and at some point it lost one of its all-weather windows.
Those of you who are familiar with Eric Brooman's Utah Belt will quickly see the influence of his work on both the paint scheme and the railroad name. It wasn't until a few years after these units were built that I decided on the more modern scheme with the large CWE letters on the side and the "Central Belt" logo on the front. Note also that I hadn't decided on the practice of mounting the bells on the long hoods at this point. This unit was also completed around 1980.
In addition to the sound decoder, I plan to re-number this unit in the 1750 series, update the weathering, and add headlights to either end. With any luck, whoever gets the Big Chimney Roustabout at the next op session will find two SD9's on the point and some sound for a change.
Before discussing some of the nuances of the TIBS method of car movements, I need to give credit where credit is due. The train information cards that were shown in the previous post, which inform the crews where the train originates, terminates, and what work it performs, were copied from cards that Mike Dodd developed for his HO scale Virginian Railroad. Here is a link to Mike's website: http://virginian.mdodd.com/. In addition to the train information cards, there is a lot of other interesting, informative, and useful information on his website.
Using the TIBS method of providing information for spotting cars and blocking trains appears to be a very clear and concise way to provide information to operators. It is also a fairly easy system to understand and doesn't require that operators be familiar with all the locations on the layout in order to properly spot and block cars. This can be particularly useful for individuals who are new to the layout or haven't participated in many sessions. I'm quickly learning that the more information you can provide crews regarding the operation of the railroad, the more comfortable they'll feel during a session. And the more comfortable they are, the more fun they'll hvae running the railroad.
The TIBS method of car movements also appears to be very flexible. I recently changed the track arrangement at Logan, WV in order to provide a location for an ammonium nitrate unloader. The spur here only served as a team track in the past, and while that provided for a number of different loads to be spotted at this location, there was only one TIBS code. With the addition of the unloader, I simply went back to the TIBS Directory and added another industry under Logan and assigned a new TIBS code. There is also great flexibility in changing the order in which cars are blocked on the yard blocing and in adding and deleting trains that can be made up in the various yards.
In his article, Dan Holbrook mentions that one of the drawbacks of TIBS is that it can remove some of the realism when operators are focusing on the alphanumeric codes on the waybills instead of actual locations and industries on the layout and the overall system. It appears to me that once operators become familiar with the layout, the focus will shift toward focusing on the actual industries and towns. Having completed structures in each location will also help this regard. But until then, TIBS should be able to provide them with confidence that they'll be able to successfully handle whatever tasks they are assigned. Time will tell, but Dan Holbrook was very impressed with how well the system worked for the Midwest Railroad Modelers club.
At some point in the future, I'll follow this discussion up with a look at some of the new waybills and empty mine car route orders that I've been adding to the layout.
In the previous post we reviewed how the Train Industry and Blocking System (TIBS) is used to assign alphanumeric characters to locations both on and off the layout. These codes assist operators in spotting cars at the appropriate locations on the layout. But the real key to making TIBS work effectively are the blocking charts. These charts are used to instruct road crews on what work is to be performed at each town on the layout and are used by yard crews to block trains.
Each town that has multiple industries has a town chart hanging on a clip board on the fascia. The town chart lists all of the trains that have work in the town and further describes exactly what duties the train crew is perform. Let's look at the town chart for Big Chimney, West Virginia to explore this further.
Note that the chart includes both locals and way freights that have work in Big Chimney and they are listed on the left hand side of the chart. You would know ahead of time whether or not your movement had work at Big Chimney by looking at your train card. These cards list the originating point, terminating point, and all the work to be done by the crew. The train card for NPNM-5, a way freight that originates at Hollister Yard in North Pierce, and the Big Chimney Roustabout, are shown below.

The Big Chimney Roustabout is the local the originates at Hollister Yard in North Pierce, West Virginia. The train proceeds to Big Chimney, works all the industries there, and then returns to North Pierce. So the first step is to find our train on the chart. We can see that our train set outs any car with a K10 through K20 alphanumeric code. We know that K is the alpha code for Big Chimney, so these cars will be spotted at local industries here. The town chart tells us where to set out and pick up cars, and we're instructed to spot the cars according to the waybills. We can also see that we are to pick up cars at Big Chimney. The chart tells us to pick up any cars with N, O, P, Q, R, S, T, and U alphanumeric symbols. Note that all of these locations are west of Big Chimney. Any cars with alphanumeric symbols representing locations east of Big Chimney will be left here for other trains. The chart further tells us to take our pick-ups to North Pierce, where our movement terminates. The chart provides all the information we need to properly spot cars in town and instructs us which specific cars we need to pick up.
Now let's look at a way freight, train NPNM-5. This train originates at Hollister Yard and proceeds east, performing work at Big Chimney and Nelsonville before moving on to terminate in staging. At Big Chimney, NPNM-5 would set out and spot any cars classified as K and set out any cars classified as J, which is the Elkwater Branch. The town chart informs the crew where to spot the J cars. Note that the train picks up any cars headed east and takes them to either Nelsonville or staging. Any cars left by the Big Chimney Roustabout or the Elkwater Branch Roustabout that are headed east would be picked up by Train NPNM-5.
The Elkwater Branch Roustabout comes out of staging at Big Chimney heading east and sets out any eastbound cars. As the Big Chimney Roustabout will work the town later, the Elkwater Branch Roustabout swaps ends with its power and cab and heads west to Hollister Yard without making any pick-ups.
For the two yards on the layout at Nelsonville and North Pierce, there are yard charts in addition to the town charts. The yard charts list the trains that originate in the yard and provide instructions for blocking the trains. The charts also provide instructions for the order in which the trains need to be assembled and dispatched as well as the motive power to be used. Let's look at the chart for Hollister Yard.

The yardmaster at Hollister checks the instructions in the lower left and sees that his first task is to begin assembling the 4 trains listed. He also notes that the Sand Fork Shifter should be sent out as soon as possible, so he focuses on this train first. Looking at the blocking chart, he sees that the Sand Fork Shifter, which is a mine run that serves the tipples on the Sand Fork Branch, is eastbound and will take cars with an I TIBS symbol. He scans the cars in the yard for any waybills with an I on them and begins to assemble the train. The cars will be assembled in the order listed on the blocking chart. As this is a mine run, he also checks the Empty Mine Car Route Orders to see if any of the mines on the Sand Fork Branch have ordered empties. The Empty Mine Car Route Orders will also have TIBS symbol on them just like the waybills. Once all of the I cars and any empty hopper cars are assembled, he calls the Dispatcher for a crew. When the crew arrives at the yard, the yardmaster assigns power and pulls a cab for the train. Once everything is together and the crew pumps up the air, they call the dispatcher for orders.
Now that the Sand Fork Shifter has left, the yardmaster focuses on making up the Big Chimney Roustabout. The yardmaster will look for any cars in the yard with a waybill that has a J on it and will begin to assemble them in the order listed. The process will follow the same sequence as was used for NPNM-5.
In the next post we'll focus on some of the nuances of this system and the pros and cons.

.JPG)
.JPG)
.JPG)



.JPG)
.JPG)


