At the end of the last op session, there were a handful of trains that hadn't run. Rather than just leave them for next time, I decided to run a few of them. One of the trains was MN-68 which runs from Morgantown, WV to New Market, VA. This train has set-outs and pick-ups in North Pierce. While I had caught glimpses of this train being worked in the past, I had never brought it into the yard myself and worked it. Actually running the trains on the railroad can teach you a bit about what challenges the crews face and show what parts of the track plan design don't work.
The track plan diagram below shows the layout of Hollister Yard in North Pierce.
And the photo below shows a close-up of the track arrangement at Hollister Yard.
The yard is really two small yards combined- a coal marshaling yard and a freight yard. The intent of the original design was to have the freight yard worked by the lead on the left and the coal yard worked from Coal 1. Any freight train that needed to be worked would come in on one of the yard tracks. And while I knew there would be locals that would handle both coal and freight, I didn't plan for how the freight and coal would be combined in the yard prior to departure and broken up upon return.
As fate would have it, every yard crew to date has worked the way freights out on the main. The pick-ups are brought out onto either the main or the siding and the switcher works the train. Once the train has departed, the switcher takes the set-outs back to the yard. Looking at the track plan, you can see how far out of the yard the switcher has to travel in order to get onto the main and into the siding. Depending upon the number of pick-ups, the yard crew would have to go past the yard limits to the east. And on the west end, there's almost no room to get out onto the main without blowing through the yard limits.
So why aren't the freights getting worked in the yard as originally intended? At the end of the last session, I discovered why- the yard gets too full during a session to bring a train in and work it. The yard is relatively empty at the end of each session, and I knew it could get busy there mid-session depending upon the ebb and flow of traffic, but it never occurred to me that it would be too full to work a train. And if the freights were going to be worked on the main, something had to be done to cut down on the time and effort to get cars out and back.
So I proposed a solution to several of the crew members that usually work Hollister Yard. The photo below shows the result- a new crossover that's going in between the main and the yard.
This crossover will provide much better access to the main from the yard and should cut down significantly on the amount of time and effort it takes to work a train on the main. One of the crew also suggested a connection between the freight yard and the coal yard so that cars could be passed back and forth without having to run out to either end of the yard. The template in the photo above shows the proposed location of that connection. I had originally planned to located a scale here but that won't work for a number of reasons. So the turnout off Coal 1 (where the GP38's are sitting) will connect with Freight 4 just below the fuel tank of 2013.
And in order to provide as much flexibility as possible to the yard crews, another crossover will connect the main and the freight yard on the east end. The photo below shows where this connection will be made.
Hopefully, these changes will help improve the overall operation of the yard at North Pierce. It just goes to show, even the best laid plans...
The bridge project at Nelsonville is progressing. As with every major scenery project I've undertaken, plans change as you get further into it. Once the bridges were in place, the next step was to work on the railings. But I realized that I would have to lean over them to finish the scenery around the station. And that was sure recipe for disaster- and broken railings. So I finished up the scenery around and behind the station first. Here are a couple of shots of progress so far.
I'm now working on the two signals that will control eastbound movements at the east end of Nelsonville (the branch coming onto the main in the upper left hand corner of the photo above and just to the left of the photo on the main). Slowly but surely, progress is being made!
The new panels at Big Chimney and Cedar Falls Jct. have been installed and... hit the drum roll please... THEY WORK! Not that I had any doubt about whether or not the SBS components would operate as advertised. The question was whether or not yours truly could hook everything up correctly and have it actually perform as it was designed. And so far, everything looks OK.
The photo below shows the new panel installed at Big Chimney. Note the repeater signals on the fascia. The westbound signals on the cantilevered signal bridge at the west end of Big Chimney can be difficult to see and the dwarfs can't be seen from the aisle. Repeater signals were necessary to insure that crews would know what aspects were being displayed.
In the photo above, the turnout at the west end of Big Chimney is lined for the main and there are at least two clear blocks heading west. In the photo below, the turnout is lined for the siding and there are two clear blocks westbound.
In the photo below, the turnout at the west end of Big Chimney is lined for the siding and the turnout at Petersburg Jct. is lined for the branch. The name of the aspect shown for the siding is Approach and the indication is Proceed prepared to stop at the next signal. The westbound crew can expect to find a Stop indication on the westbound main signal at Petersburg Jct..
Last up is a shot of the new panel at Cedar Falls Jct. The repeater signal shows the aspect for the westbound main signal which isn't visible from the aisle. A bit of touch-up paint is needed on the fascia around the panel.
These two panels took an inordinate amount of time to complete due to the repeater signals that had to be wired up. The next three panels are fairly simple and should go together much more quickly.
I need to thank Gerry Albers, who is the mastermind behind SBS, for all of his time, effort and support in getting the RCS cards up and running. His patience with my lack of electrical knowledge and never ending questions has been a Godsend, and everything you've seen that's either signal or push-button route related has been a result of his help. But even more special than all of the help has been the friendship- thanks a million, Gerry.
Over the last month or so, I've been working on a number of small structures and details for various areas on the railroad. Several of the small structures are part of my efforts to make some progress on the engine terminal at North Pierce. I learned long ago that it is best to work from the backdrop toward the edge of the fascia when doing scenery work. And as usual, one thing leads to another. In order to put down the last layer of scenery materials in and around the supply tracks, which are closest to the backdrop, several small structures needed to be built and placed in position so that the scenery could be built up around them. The first structure was the pump house for the diesel fuel storage tank. It was scratch-built using Evergreen sheet styrene and Grandt Line doors and windows.

Also shown in the photo above are diesel fuel unloading cranes. These were scratch-built using Williams Brothers pipe fittings and Evergreen channel. The concrete foundations are small, square pieces of plaster. These were common on the C&O and the L&N. The photo below shows similar cranes on the L&N at Hazard, KY in a photo taken by Stuart Thayer. If I had studied the photo a little more closely, I would have added the shut-off valve near the base. Sigh.

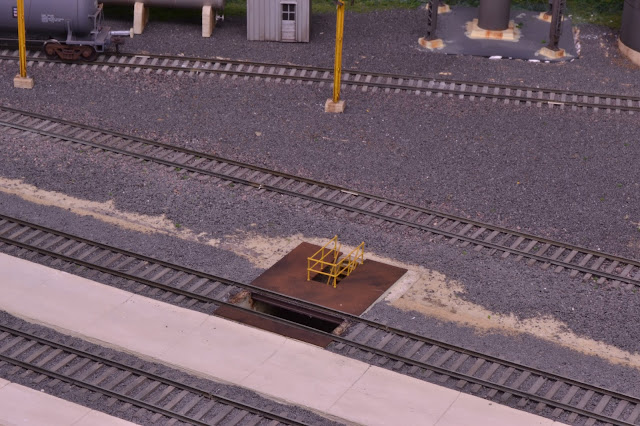
Next up is the inspection pit. The base for this is an ash pit that was part of a craftsman kit that my Stepfather built many years ago. I still have the ash conveyor and if I ever get around to back-dating to steam, I'll use it here. My original plan was to simply cover the pit with styrene and weather it to look like steel plate. Then I got the idea of an inspection pit. In checking some photos taken by Everett Young of the C&O engine service area at Martin, KY, there appears to be a yellow railing around a small section of one of the tracks. It certainly appears to be an inspection pit of some type. The railing are from Tichy as are the stairs to the pit.

While studying the photos of the Martin, KY yard, I noticed a small, red box on the side of the station. Speculating again, it appeared to be a fire extinguisher box of some type. The Atlas GP38 and GP40 come with a small equipment box of some type. I've never found an explanation for exactly what it's supposed to be, but it sure looked like it could make a neat fire extinguisher box. The only challenge would be finding decals small enough to label it. Then along comes Robby Vaughn who seems to be able to create just about anything, from cast resin 60 ton L&N hopper cars to decals so small you can't read them. He put together a great set of "FIRE" label decals and you can see some of them in the photos below.
And while he was at it, Robby also made a great set of mailbox decals. The mailboxes are by Korber and were painted and lettered based upon a photo taken in the 1960's. Robby got the pick-up time on the small white schedule wrong, but I don't think anybody will notice...
And last up is a quick update on scenery. The bridges at the engine terminal are finally under way and the photo below shows the progress so far. This is one of the last major scenery projects on the railroad and will take some time to complete. The first objective is to get the bridges in place so that operations can resume. More to follow on this project.
I stumbled across "The Position Light" bog earlier this morning and was amazed at all of the information it contains regarding all aspects of railroad signalling. I was searching for locking devices on CTC panels and a picture of Amtrak's THORN Tower appeared in the images page. Here's a link to the blog post: http://position-light.blogspot.com/2011/12/amtrak-thorn-interlocking.html. There's an incredible wealth of information in this post on the operations of THORN Tower along with a large number of photos and diagrams. And the home page for the blog is now listed in the Great Railroad Modeling Sites panel on the right of this blog, too. Absolutely great stuff!
For those of you who have interest at all in railroad signals, spend a little time on this blog.
As each new group of signals is installed and new blocks are wired, I have to go back and change the spreadsheets for the signal input for the previously installed signals. The last signal along the line before an unsignaled section of track is always set to Red over Yellow, or restrictive. Once additional signals are installed, the aspects for this last signal need to be changed to reflect the new configuration of blocks and signals. Other signal inputs also have to be changed to reflect the new configuration.
During the last operating session, I asked the crews to report any aspects that weren't displaying what was observed in the field. Due to the recent installation of the signals and blocks at the west end of Nelsonville, I had changed a number of inputs to various signals and wanted to confirm whether or not they were working correctly.
As Robby Vaughn brought COXE 532 down the mountain from Summit Springs to Nelsonville, he encountered a Stop signal at BA Cabin. Train NMMT-5 was on the main clear of the turnout which was lined for the yard. Robby should have had a Red over Yellow, or Restricting, giving him permission into the yard. The photo below shows the approximate location of NMMT-5 when Robby approached BA Cabin.
It quickly became apparent that the locomotive on NMMT-5 had run into the block that included the turnout to the yard from the main (far left side of the picture above). Of course, the engineer on NMMT-5 was none other than the infamous Smokey Doll who just happened to have spent his entire career on the SOU and NS. There was no convincing him that he had overshot the signal. Which, of course, he hadn't. The problem was the position of the signal relative to the block.
In the picture below, engine 3017 is just short of the start of the next block. The red arrow shows gap between the blocks.
As I don't want to place the gap for the block anywhere in the turnout to the siding before the signal, I need to move the signal. And in order to position the signal head to the right of the track it controls, I'll have to build a signal bridge for this location and place it to the right of the siding where indicated by the arrow in the photo below.
The good news is that I can use the current signal at the east end of Nelsonville to control the westbound entrance to the yard and the junction with the Dry Fork Branch. The bad news is that I need to build another signal bridge.
Fortunately, I have a supply of signal bridges on hand and the need to build one for this location has provided the inspiration to build the one for the east end of Nelsonville that will control eastbound movements on the main and the Dry Creek Branch. And that, in turn, has provided the inspiration to build the signal controlling the entrance to the main from the Dry Creek Branch. With any luck, we'll have the eastern half of the railroad signaled in the not too distant future.
It was about mid-way through the last operating session when I noticed that the rascals had showed up. As I walked into the railroad room from the crew lounge, I spotted an odd sight at the end of the west staging yard. It appeared that someone had set up a new spur complete with a building and a car spotted at it. A closer observation revealed what you see in the photo below.
The infamous K&LE horse car had arrived on the CWE and was spotted at a to-be-named industry. The horse car is the work of the illustrious John Miller and he was the one who found the "building" back in the workshop.
Before the session started, we had talked briefly about the whereabouts of the horse car. When last seen, it was headed westbound on the CSAO of Deb and Matt Snell. It has also been spotted on the FPS and the DP in the recent past.
There are several individuals who can't be trusted to be alone in any railroad room. I won't name names, but the creator of this car is the ring leader and the guy behind the FPS has been known to be his able accomplice...


