Over the weekend, reports surfaced once again of a mysterious, unattended campfire. This time, the fire was reported in the area around East Valley along the right-of-way of the Pennsylvania & Western. Several well known miscreants were reported to have been in the area, and authorities suspect that they are responsible for the fire.
Railroad officials are sparing no resources in order to find the fire before it gets to the large wooden trestle just outside of East Valley. An anonymous local resident sent in the photo below of what appears to be the beginnings of a campfire.

Officials are confident that the fire will be located and the suspects brought to justice. The Pennsylvania & Western is known for its competent management and local emergency services are rated among the finest in the county. Said Superintendent Bartizek, "This isn't like some railroad in West Virginia where they can't seem to find the fire even with smoke in the area. Our employees are highly skilled individuals who will have this issue resolved posthaste." Mr. Bartizek was referring to a fire on the Forest Park Southern that was reported during the last Friday night operating session and still hasn't been found. There are also rumors of numerous fires along the right of way of the Kanawha & Lake Erie Railroad in Cincinnati, Ohio. Officials are unsure whether or not a traveling band of mischievous misfits are responsible for setting all of these fires or if it's the work of numerous individuals.
Yesterday, Bob Bartizek hosted an operating session on his beautiful Pennsylvania & Western O-gauge railroad. For more information on the layout, visit Bob's website at http://www.pennwestrr.com/. The Pennsylvania & Western was also featured in a recent addition of TrainsMasters TV and a preview, along with the full video, can be found here: http://www.trainmasters.tv/videos/2014-03-1-tmtv-mar-2014-edition-act-i.
The operators at yesterday's session are part of a group that operate on a handful of layouts in the greater Cincinnati area. Everyone was up to their usual antics, and despite the actions of several known miscreants, the railroad was able to move a significant amount of freight and satisfy all of its customers. Let's take a look at some of the action.
Annville Yard is always a busy place and can accommodate a yard master, a yard switcher and a hostler. In the photo below, Stuart Thayer is working a cut of cars on the west end of the yard. Stuart was instrumental in helping to set up operations on the CWE.
In the next photo we see yard master Matt Snell directing traffic. If that name looks familiar, it's probably because he's one of the most prolific authors in the hobby. He and his wife Debie have built an incredible layout representing the Conrail Shared Assets Operation in and around Newark, NJ. The layout was featured in the 2006 edition of Great Model Railroads.
If the two individuals in the photo below look like they've been up to no good, it's probably because they have.
Actually, that's Bill "Smokey" Doll on the left and John Miller. Bill's Forest Park Southern appeared in a recent edition of TrainMaster's TV as well, and John's Kanawha & Lake Erie will be featured in an upcoming edition. Bill was disappointed that, once again, he was unable to get the Red's game on any of the staging yard monitors.
In the next photo, we see Bob Chapman (right) and Gerry Albers working a coal train through Lebanon. Gerry's Deepwater District of the Virginian was featured in the 2014 edition of Great Model Railroads and is an amazing layout. In the background, the superintendent is watching the action.
At AE tower, all freight trains are required to stop and set retainers before heading down the hill through Horseshoe Curve. In the photo below, Robby Vaughn (left) and Anthony Hardy are waiting for the brakemen to finish the job. Both of these gentlemen model the L&N in the coal fields of Kentucky and have outstanding layouts.
In the photo below, Debie Snell and Jim Rollwage are cooling their heels at Lebanon. Jim's beautiful Denver Pacific branch of the Union Pacific was also featured in a recent edition of TrainMasters TV.
The reason Debie and Jim are cooling their heels is apparent in the next photo. They are both tied up at Lebanon waiting to get clearance into Annville. There were reports of a fire just west of Annville and emergency crews had to be dispatched to check the right-of-way before more traffic could move into the yard.
And we'll close with a shot of power at the engine terminal in Annville.
Mike Havron worked as the able dispatcher during the second half of the session and I didn't get a chance to sneak into the other room to get a shot of him in action. Sorry, Mike!
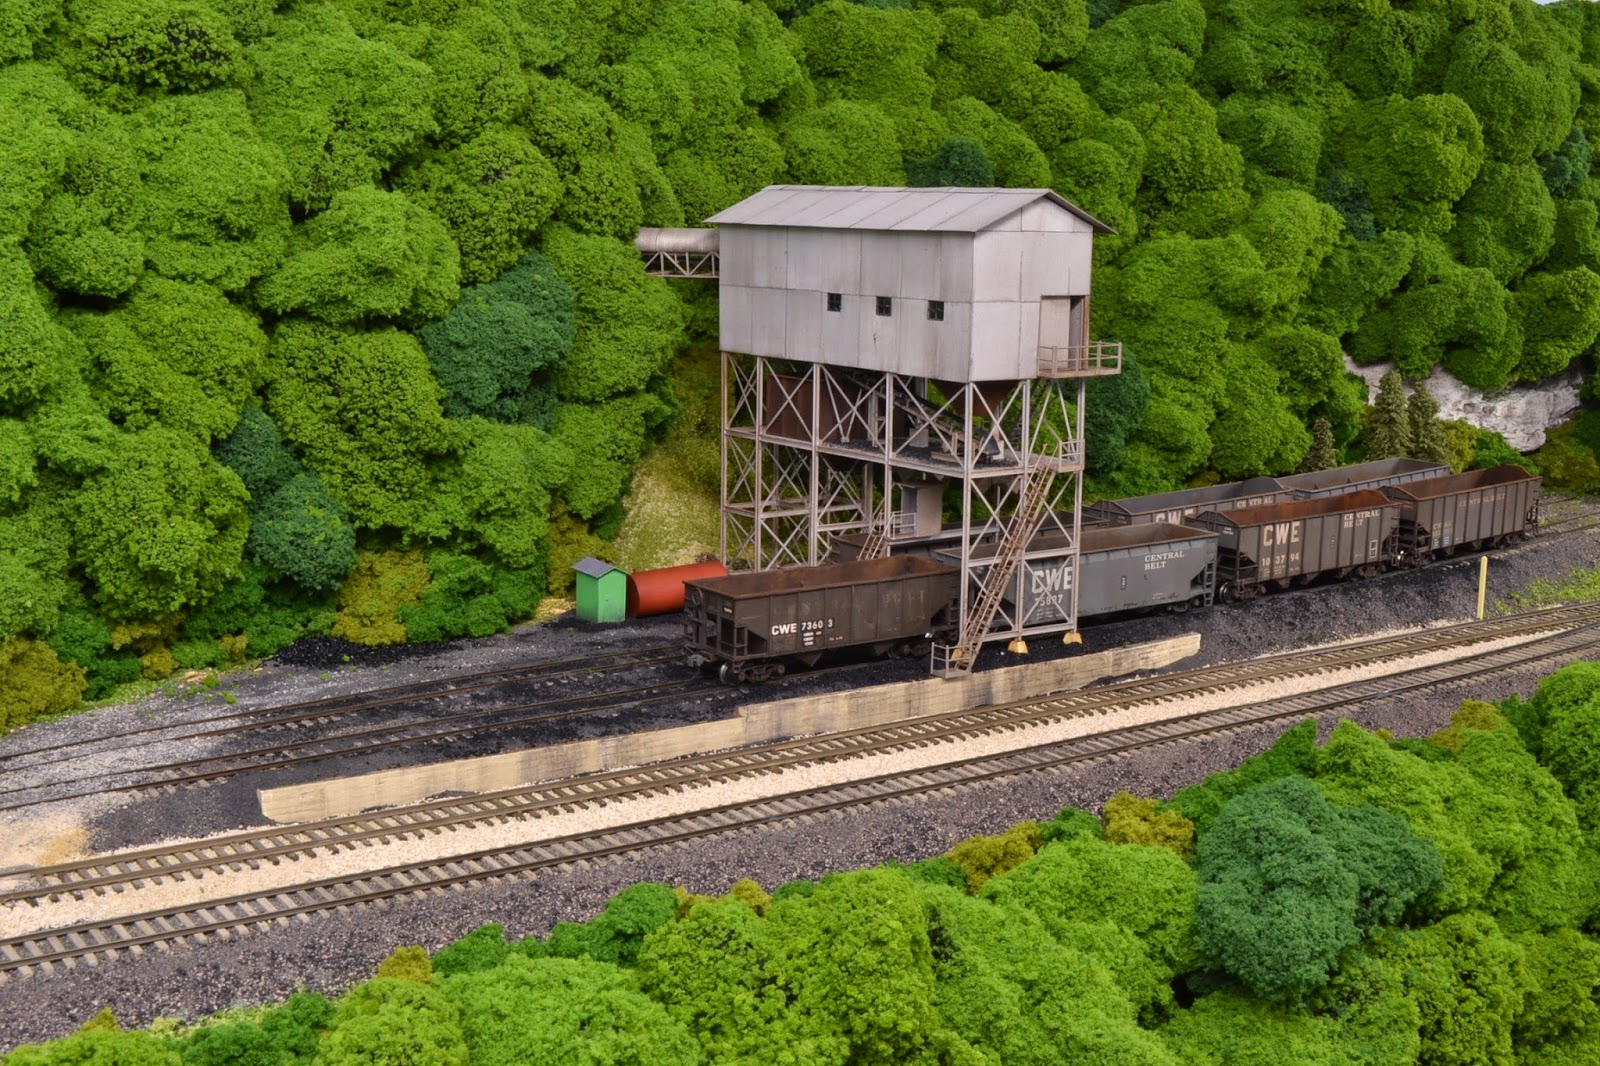
For the first time in over thirty years, CWE hopper cars 73603 and 73582 are finally in regular revenue service on the railroad. These cars were built in the early 1980's and, as described in an earlier post, were the first two hopper cars ever lettered for the Chesapeake Wheeling & Erie.
New numbers and cut levers were added and the interiors and exteriors were re-weathered.
The photo below shows 73603 spotted at the recently completed Dry Creek Coal #2 tipple at Summit Springs.
Upgrading these cars probably didn't take much less time than building and painting a couple of new hopper cars, but it was a fun project nevertheless. And it's kind of neat to have a couple of cars with a little bit of history on the layout.
Now that all of the scenery and structures are in place at Dry Creek Coal Tipple #2 (more on that later), I've started re-staging the layout for the next operating session. Last night I brought one of the westbound freights back into the yard from staging and moved its power to the house. It just so happens that the two new F7's (more on that later, too) were there along with some of the other first generation power used for some of the locals. I thought it would be neat to get a shot of all of this first generation power at the Hollister Yard engine terminal.

In this picture, you can see six units that are still in the original, as-delivered paint scheme (GP7 1542, SD9 1774, F7A 1564, F7A 1562, F7A 1565, and F7B 1573). All have been re-numbered into the current numbering system. Also shown in this picture is SD9 1763 which is still in an experimental paint scheme that was applied to a few units in the late 1960's. The entire short hood was painted yellow in an attempt to improve visibility but this was quickly abandoned as ineffective.
The new F-units, along with the GP7, will take over duties on the Sand Fork Shifter while the F7 A&B units and the GP9 will move to Nelsonville. They'll be used on the Summit Springs Shifter that works Laurel Ridge Coal Company's prep plant at Summit Springs. The U33C and U28B that have worked the Summit Springs Shifter in the past will be assigned to other duties.
From the very beginning, I had always planned to have signals on the layout. The goal was to have a fully operational Centralized Traffic Control system complete with a dispatcher's panel based upon one of the Union Switch and Signal installations. The dispatcher would be able to control the entire railroad from a remote location, and trains would move according to signal indications. I studied whatever material I could find on signals and signal systems. I learned what the various aspects and indications meant and began to figure out how they might apply to certain locations on the layout.
As progress continued on the layout, I added signals based upon what I thought would be a typical CTC installation. All of the signals have LED's and are wired for operation. Then in 2004, I purchased the user's manual and related materials for Bruce Chubb's Computer/Model Railroad Interface (C/MRI). As I began working through the manual and designing the system, it became apparent that this project would require much more time and effort than I originally anticipated. The programming required to make even a small layout like mine operational simply seemed overwhelming. The manual went up on the shelve to be considered another day.
Fast forward almost ten years and I meet Gerry Albers. Gerry and his crew have created one of the most remarkable model railroads that I have ever seen. The Deepwater District of the Virginian Railway was featured in Great Model Railroads 2013 and the layout can be seen here: http://www.deepwaterdistrict.com/. The railroad features a fully operation CTC system that utilizes a program developed by Gerry. Information on this product and the related hardware is available here: http://www.signalsbyspreadsheet.com/. I attended several operating sessions on the Deepwater District and got to see the system in action. I then attended a clinic on signaling at a local hobby shop that was put on by Gerry and the hook was set. I had finally found a system that I could manage in terms of setting up the signal spreadsheets and installing the hardware.
In order to install the signal system, the layout has to be wired in blocks. The CWE is divided into two separate power districts and has many built-in gaps due to the hand-laid track. I used all the recommended wiring techniques when building the layout so it appeared there wouldn't be a lot to do in order to get the layout ready for signalling. All I needed to do was verify where all of the existing blocks were located and I could begin to plan what additional blocks would be needed. That's when the Nightmare began.
I disconnected the power district furthest from the power supply on one half of the layout to begin the testing. Surprisingly, the whole section still had power. So I disconnected the bus to the next session. Everything still had power. I eventually disconnected every district from the main bus- and the entire half of the layout still had power. There were three track feeder wires that ran from the terminal strip where the power came in from the booster connection that were the only possible source of power left. I disconnected the first two- and the entire half of the layout still had power. Finally, I disconnected the last one and the power was off. Half of the layout was receiving power from one track feeder wire. I'm sure it wouldn't have been enough to run trains, but power was there nevertheless.
After a lot of head scratching, it occurred to me that the power from that one feeder to those two rails took a long trip all the way around the layout. Out along the solid connection from the Sand Fork Branch, down through Big Chimney, down the feeder wires at Big Chimney, back up the feeder wires at Summit Springs- you get the picture. It became apparent that I was going to have to document the electrical connections on the entire layout if I ever wanted to figure out how to set up the blocks for the signal system.
So I spent the next two and half days under the layout tracing wires, drawing diagrams, cutting new gaps, and installing new feeders. Fortunately, I had just about finished the drawings for the signal system so I could use this as a reference when establishing where the new blocks should be. The drawing below shows the blocks and signals at Big Chimney (the red X's are feeders and the red O's are gaps) that were used for this process.
The benefit of all of this work is that I now have a notebook that contains wiring diagrams for the entire layout. The drawing below shows the master schematic for Zone 2.
And there is a separate drawing for each zone which includes all of the feeder wires and their locations. The drawing below shows the zone that is controlled by the terminal strip between Bus 2 and Bus 3.
Having these diagrams and the layout properly connected to separate power blocks is something I should have done many years ago. In fact, the lesson here is to do this as you build the layout, not after everything is operational and you've stored more stuff than you ever thought you owned under the layout. Believe me, your knees will thank you for this.
Inspiration for projects can come out of nowhere sometimes, and that's what happened with the two hopper cars I'm working on right now. I had been planning to buy some Microscale trim film decals for another project and the idea came to me to use the trim film on these old cars. They were the first two cars ever painted and lettered for the Chesapeake, Wheeling & Erie and are old Athearn Blue Box 50-ton hopper cars.
The photo below shows how these cars look today. They were painted and lettered before I had come up with the CWE herald and long before I put together a comprehensive numbering system for the railroad. I have no idea where the 3,000 series numbers came from- these cars would have been competed in the 1980- 1981 time frame.
These cars also show some of my first attempts at weathering. I've long forgotten exactly what I did, but I'm fairly certain that most of it was done with an airbrush. I do remember that I weathered the interiors using techniques that Bill Darnaby outlined in an article in RMC in the late 1970's. That article convinced me that every car on the layout should be weathered to some degree and I still use some of his techniques today. The photo below shows the interior of the cars.
Both of the cars are now in the shop. The cut levers have been replaced and will be painted along with the Kadee wheel sets. I'm not sure when the wheels sets were added, but they were never painted. I then plan to add some Microscale trim film over the reporting marks and update the cars with correct numbers. With some updated weathering on the trucks, couplers and car body, they'll be ready for regular revenue service.
Slowly but surely, progress is being made on the scenery at Summit Springs where Dry Creek Coal Tipple #2 will be located. The photos below shows the area with the first layer of ground cover and scenery in place.
The weathering on the base of the tipple is finished as you can see in the photo below. All that remains to be added is a bit of coal and coal dust around the conveyor on the first level.
Once all of the trees are in place, I'll come back and add additional layers of ground cover, small trees and bushes. Whenever I get deep into a scenery project like this, the area of the layout in which I'm working ends up a mess. The photo below shows how things look right now.
.JPG) In addition to the scenery at Summit Springs, I'm also adding scenery around the west end of the yard at Nelsonville. You can see the new scenery between the tracks in the center of the picture and the fascia. The next step here will be to add the final layer of ballast on the tracks. The area in the right of the picture between the tracks and the fascia will eventually have a speeder shed, two track worker dwellings and some other small buildings. The old passenger car to the far left in the picture will serve as the yard office and will be located further to the right in the photo above.
In addition to the scenery at Summit Springs, I'm also adding scenery around the west end of the yard at Nelsonville. You can see the new scenery between the tracks in the center of the picture and the fascia. The next step here will be to add the final layer of ballast on the tracks. The area in the right of the picture between the tracks and the fascia will eventually have a speeder shed, two track worker dwellings and some other small buildings. The old passenger car to the far left in the picture will serve as the yard office and will be located further to the right in the photo above.
With any luck, I might have the area around Summit Springs finished by the next operating session.




.JPG)
.JPG)
.JPG)