The Chesapeake, Wheeling and Erie Railroad finally held its first ever operating session, and it was a blast! Good friends Stuart Thayer, who has been instrumental in developing the operating scheme on the layout, and Jim Rollwage (you can see Jim's beautiful Denver Pacific layout on YouTube here: http://www.youtube.com/watch?v=VMUCKyocX-4) came over and Stuart brought Anthony Hardy with him from Lexington. Stuart and Jim have been involved in operations for over 30 years, and Anthony's layout appeared in the 2003 edition of Model Railroad Planning. Given the level of knowledge and experience of the group, I was a bit nervous to say the least. All in all, though, the session went fairly smoothly.
The layout currently has only one staging yard in operation, so the plan was to run six trains: 1) Way freight Train 304 (staging to the yard at North Pierce); 2) COXE 42- coal empties from staging to North Pierce; 3) The Big Chimney Roustabout (local from North Pierce to Big Chimney, WV and back; 4) Sand Fork Mine Run (empties from North Pierce to the tipples on the Sand Fork Branch and loads back to North Pierce); 5) Way freight Train 205 (North Pierce to staging); and, 6) COXL 51- coal loads from North Pierce to staging. I served as yardmaster/dispatcher and we used track warrants for train movements. The session took about 2 1/2 hours, and everybody appeared to enjoy themselves.
As expected, the gremlins showed up and almost wrecked the session before it even started. The morning of the session I turned on the layout only to get a short buzzer from the CVP Zone Master at North Pierce. I spent the next two hours tracking down the short, which resulted from the closing of a gap at the frog on one of the turnouts in Hollister Yard. On visual inspection it appeared to be o.k., but once I re-cut the gap everything was fine. Once the session got started, the two old Atlas switches at the entrance to staging acted up, shorting when the six axle diesels crossed them. They have both been torn out and are being replaced with hand-laid turnouts. And the two commercial switches on the main at either end of Big Chimney acted up. The closure rail on the curved turnout at the west end wouldn't stay in gauge (I spent two hours the previous day trying to fix the power in the frog on this turnout) and the turnout at the east end shorted when diesels took the diverging route. Both of these switches will be replaced with hand-laid turnouts before the next session. The rest of the layout performed very well, and I was pleased that there weren't more issues.
This was only the second time that I have ever operated on a layout, and I quickly realized what I've been missing. It was even more fun than I anticipated and I can't wait until the next session. And I've got to thank Stuart for getting me an invitation to operate on Jim's layout. That was the first time for operations for me, and Stuart and Jim couldn't have been more patient and helpful. Talk about a great introduction into another aspect of this amazing hobby! And there will be photos to post from the next session.

Wednesday, May 2, 2012

Saturday, April 21, 2012
Progress on the truck dump tipple
Last night I finished the basic construction of the small truck dump tipple that will be located at Big Chimney, WV on the layout. The receiving bin structure still needs to be glued to the base and coal added around the legs. Once that finished I'll set the structure in place and complete the scenery in the area.


This project has taken a bit longer than I thought it would and I'm anxious to get it finished. There are a number of other projects that I'm itching to get started on.
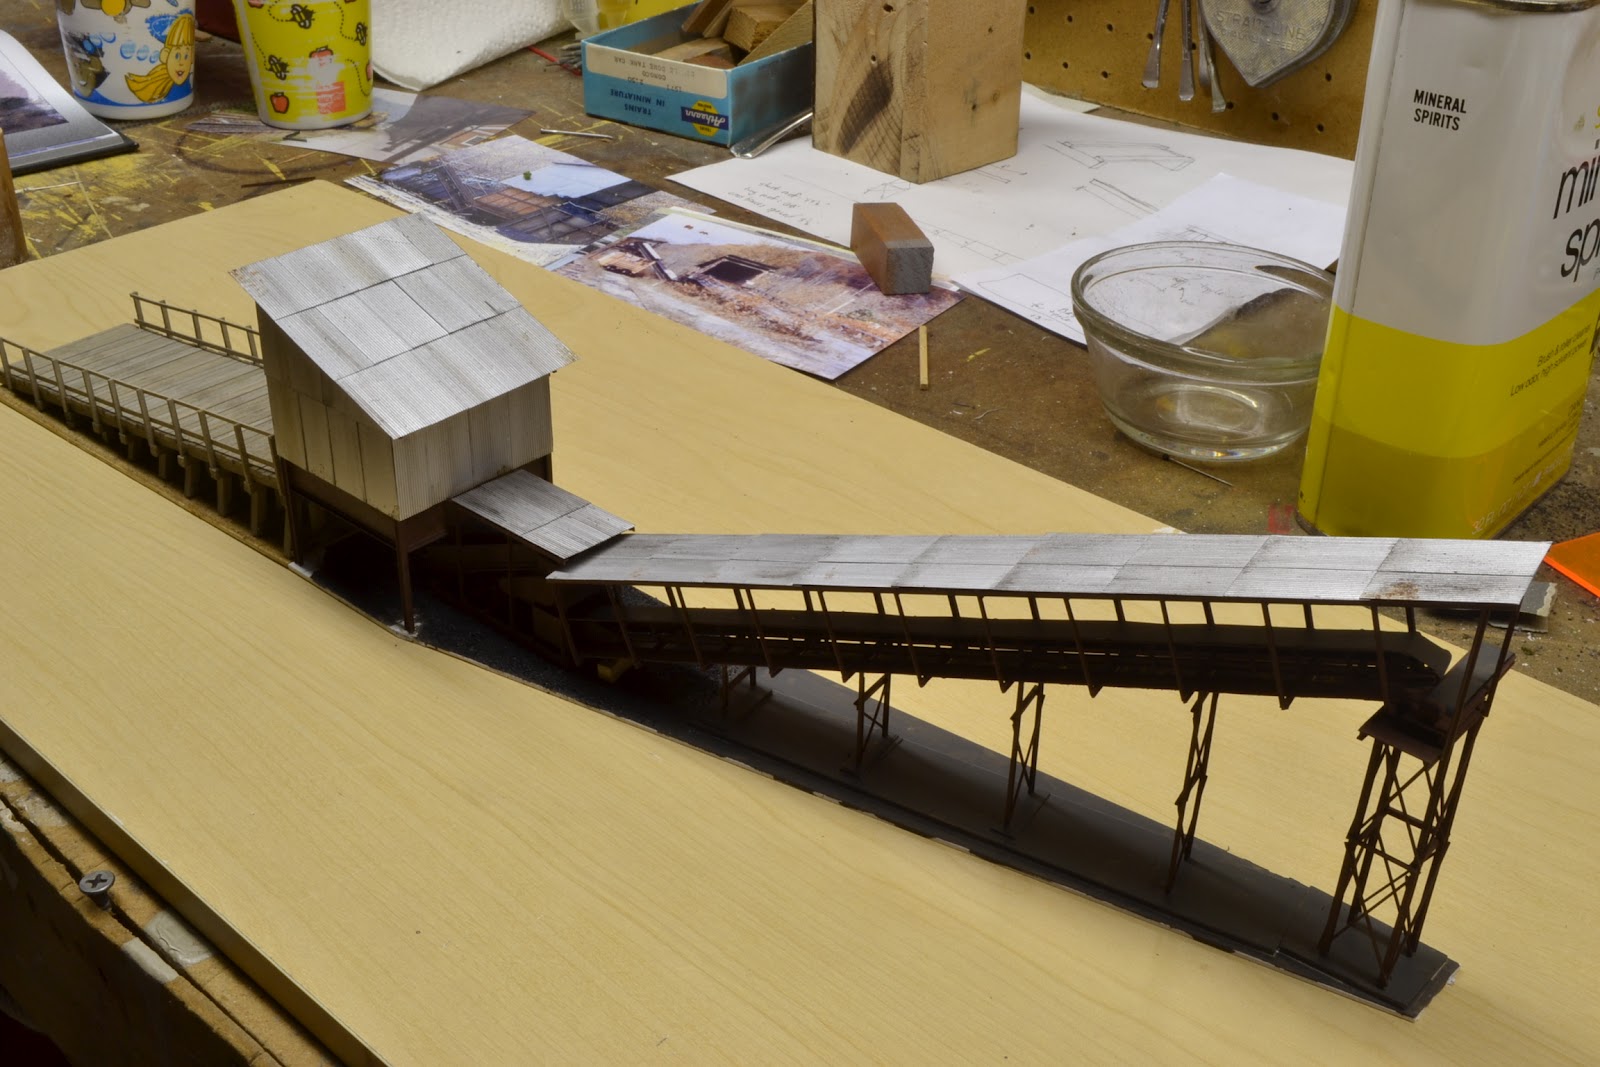


This project has taken a bit longer than I thought it would and I'm anxious to get it finished. There are a number of other projects that I'm itching to get started on.
Sunday, April 15, 2012
Getting Ready for Operations
In anticipation of my first ever operating session next weekend, I've been tuning up the layout and making a number of small improvements. I'm extremely impressed with the work that Rob Spangler has been doing on his Eighth Subdivision of the Western Pacific, and especially some of the innovative design ideas he has incorporated into his fascia. You can see his work on his thread on the Model Railroad Hobbyist forum at http://model-railroad-hobbyist.com/node/6051. I decided to steal a couple of his ideas for fascia for my layout. Below is one of the standard control panels with bill boxes and a small shelf. All of the control panels on the layout have been built this way, with the exception of the yard panel at North Pierce. More on that later.

I have always been concerned that the small shelf would be inadequate for managing the car cards, waybills and other paperwork. I also liked Rob's idea of being able to see the label on each box from above as opposed to potentially having to bend over to see it. So I added a piece of 3/4" wood across the front edge of the shelf and the top edge of the bill boxes.

Once the glue had dried I painted them to match the fascia (well, not quite- it appears that my most recent can of fascia paint doesn't quite match the old one).

The "Siding" label is temporary but shows how the labels for each of the boxes will appear once they are installed. And the piece of wood across the front of the shelf will keep the waybills from slipping off the edge. The fascia in this area has the initial coat of paint and will get the second and final coat once the scenery is complete.
For the yard panel at North Pierce, I added a strip of 1/8" Masonite across the front in order to keep the waybills from slipping off the shelf. I didn't have as much room here as on the other panels and I wanted to maintain as much space as possible for the operators to sort cards.

Hopefully, these small improvement should make it easier for the crews to manage the paper work next weekend. We shall see.

I have always been concerned that the small shelf would be inadequate for managing the car cards, waybills and other paperwork. I also liked Rob's idea of being able to see the label on each box from above as opposed to potentially having to bend over to see it. So I added a piece of 3/4" wood across the front edge of the shelf and the top edge of the bill boxes.

Once the glue had dried I painted them to match the fascia (well, not quite- it appears that my most recent can of fascia paint doesn't quite match the old one).

The "Siding" label is temporary but shows how the labels for each of the boxes will appear once they are installed. And the piece of wood across the front of the shelf will keep the waybills from slipping off the edge. The fascia in this area has the initial coat of paint and will get the second and final coat once the scenery is complete.
For the yard panel at North Pierce, I added a strip of 1/8" Masonite across the front in order to keep the waybills from slipping off the shelf. I didn't have as much room here as on the other panels and I wanted to maintain as much space as possible for the operators to sort cards.

Hopefully, these small improvement should make it easier for the crews to manage the paper work next weekend. We shall see.
Thursday, March 29, 2012
Update on Progress
Thought I would provide an update on what's been happening around the layout over the past several weeks. I have been working on a small, truck load tipple that will be located at Big Chimney, West Virginia. Below are several photos of progress to date.
.jpg)
.JPG)
This project represents a bit of a departure from past tipple construction practices as the corrugated siding will be painted and weathered before adding it to the structure. I hope to have all of the siding pieces completed and painted by next week.
Next up are the three Atlas cabooses that I mentioned in a previous post. They are seen below on the caboose track at Hollister Yard along with two Athearn wide vision cabooses that were significantly altered back in the mid- 1980's.
.jpg)
.jpg)
The Atlas cabooses have the first coat of weathering in place which will be followed by acrylic washes and powders. The scenery in this area isn't complete yet- all of the structures are set in place pending the final application of various ground covers.
Last but not least is EL 69342. This car is a Walther's kit that was originally painted for the UP. I stripped the paint, added Herald King decals (that's how long this project has been in the works) and cut levers and painted and weathered it.

This car was one of group constructed for the EL in November and December of 1974 to be used in service for General Foods. Here's a link to a photo of the prototype http://www.rr-fallenflags.org/el/frt/el69298g.jpg. As the timeframe of the layout is 1976, this car was weathered to reflect a piece of equipment that had only been in service for several years.
I have taken a few baby steps toward operations over the last month- more to follow on that topic.
.jpg)
.JPG)
This project represents a bit of a departure from past tipple construction practices as the corrugated siding will be painted and weathered before adding it to the structure. I hope to have all of the siding pieces completed and painted by next week.
Next up are the three Atlas cabooses that I mentioned in a previous post. They are seen below on the caboose track at Hollister Yard along with two Athearn wide vision cabooses that were significantly altered back in the mid- 1980's.
.jpg)
.jpg)
The Atlas cabooses have the first coat of weathering in place which will be followed by acrylic washes and powders. The scenery in this area isn't complete yet- all of the structures are set in place pending the final application of various ground covers.

This car was one of group constructed for the EL in November and December of 1974 to be used in service for General Foods. Here's a link to a photo of the prototype http://www.rr-fallenflags.org/el/frt/el69298g.jpg. As the timeframe of the layout is 1976, this car was weathered to reflect a piece of equipment that had only been in service for several years.

I have taken a few baby steps toward operations over the last month- more to follow on that topic.
Sunday, March 4, 2012
New Motive Power
While waiting for the Dullcoat to dry on the Atlas cabooses, I finished a Stewart C628 that I purchased a number of years ago. I installed a SoundTraxx TSU-AT1000 sound decoder and a Cal Scale diesel detail package. The photo below shows the unit at the engine service facilities at Hollister Yard.

The photo below shows the unit in service at the head of a hopper train getting ready to leave Hollister Yard heading east.
.JPG)
The Tsunami sound decoder sounds fantastic. The next step is to figure out how to shoot some video and add it the blog...

The photo below shows the unit in service at the head of a hopper train getting ready to leave Hollister Yard heading east.
.JPG)
The Tsunami sound decoder sounds fantastic. The next step is to figure out how to shoot some video and add it the blog...
Wednesday, February 8, 2012
SJ Cabin Scenery Update
Since I posted a portion of the Part 4 update over on the Model Railroad Hobbyist forum, there's been an interesting discussion regarding dirt and gravel road, including some shots of the beautiful dirt roads that Charlie Comstock did on several of his modules. You can see the discussion and the photos here: http://model-railroad-hobbyist.com/node/6741?page=2.
Based upon the comments and discussion, I made some changes to the dirt road and gravel area around SJ Cabin. I am reasonably pleased now with the color and texture variations, which you can see in the photos below.


As I mentioned in the post on the MRH Forum, my interest in this project is waning and I'll come back at a later date and add the final details. My next project is 3 Atlas wide vision cabooses that have been painted for the home road and are ready for weathering. Once these are complete, I'll post a blog that compares them to the caboose seen in the photo above. It's one of 4 Athearn wide visions cabooses that I heavily modified back in the mid-1980's. While they have stood the test of time in terms of appearance, they were five times the work that the Atlas cabooses have been. More to follow on this project.
Based upon the comments and discussion, I made some changes to the dirt road and gravel area around SJ Cabin. I am reasonably pleased now with the color and texture variations, which you can see in the photos below.


As I mentioned in the post on the MRH Forum, my interest in this project is waning and I'll come back at a later date and add the final details. My next project is 3 Atlas wide vision cabooses that have been painted for the home road and are ready for weathering. Once these are complete, I'll post a blog that compares them to the caboose seen in the photo above. It's one of 4 Athearn wide visions cabooses that I heavily modified back in the mid-1980's. While they have stood the test of time in terms of appearance, they were five times the work that the Atlas cabooses have been. More to follow on this project.
Sunday, February 5, 2012
New Scenery at SJ Cabin- Part 4
After the last post, Jason Lachlan suggested the addition of some rock outcroppings in this area. He sent along some great photos , and I spent a bit of time debating whether or not to add such a feature in this area. I finally decided to move on with the original plan and perhaps add some rocks a little further toward the engine service area later.
I put down some static grass in several small areas, however, once the glue had dried I wasn’t entirely pleased with the results. I’m relatively new to static grass and don’t have a lot of experience with the material. This time around I got too aggressive and ended up dumping a bit of it versus letting the static electricity pull it out and stand it up on the surface. As a result, a bit of the grass laid flat in the glue and the coverage was a bit thin. I left this area alone for a week or so, periodically looking at it and then looking at several other areas where the grass went down nicely. I finally decided that the new grass had to go. The photo below shows one of the areas after I had scraped up the static grass and re-painted the area with dark green paint.

While the paint was drying on the two areas where I scraped up the static grass, I started putting bushes in place as you can see in the photo below.

The next two photos show the static grass that I reapplied after the paint had dried. I’m using a 50/50 mix of 6mm Silfor Spring and Noch Wild Grass light green. I brushed on a 50/50 mix of white glue and wet water to secure the grass.I went slowly this time, tapping the side of the applicator and making sure that the screen was about an inch or so from the surface.


After the static grass had dried, the rest of the bushes were added. The signal cabinet is stand-in to measure the width of the dirt road in this area.


At this point I began to work on the area around the culvert leading from trackside. I started with the base of the culvert. Several years ago I went to a local stream with a coffee can and small shovel and gathered up a bunch of rocks and small gravel from the stream bed. Once the material had dried, I sifted it in ever increasingly small strainers. I eventually wound up with a nice variety of rock sizes, and the photo below shows the two smallest sizes.

The next two photos show the application of the two sizes of rocks pictured above.


I added one more layer of slightly larger rocks as can be seen in the next photo. After I took the photo, I removed some of the larger rocks as they appeared a bit too big. Once I was happy with the look and shape of the culvert bed, I applied 70% isopropyl alcohol followed by a 2:1 mix of wet water and white glue.

Once the glue had dried, I applied a dusting of Joe Fugate’s zip texturing weathering powders to help blend in the rocks. For a detailed explanation of this technique, see the November/December 2010 edition of Model Railroad Hobbyist e-zine. Back issues can be found at the following link: http://model-railroad-hobbyist.com/magazine/back-issues. I used the dirt and grime mixture that Joe described in his Ten Mile Creek video series which consists of 1 part black, 1 part brown, 1 part yellow and 4 parts plaster of paris. This appeared a little too dark to me when mixed, so I add 2 more parts of plaster. Once the weathering powder had dried, the bottom of the culvert appeared too dark. To lighten it up and add some variation in the color, I dry-brushed a dark brown thinned latex paint that I use for rock coloring. The photo below shows the final results.

To complete the scenery, I added additional layers of ballast, dirt, gravel, and weeds. I took care to make sure that the cinder ballast around the sheds was up against the sides of the buildings. I also filled in the area between structures and the track with limestone ballast. The photos below show the finished scenery.


.jpg)
The last step in completing this scene will be to put a final coat of paint on the fascia, weather the track and add details such as barrels, a switch motor, ties between the track where the motor car rails end, and other assorted odds and ends. As always, thought, comments, and criticisms are welomce.
Subscribe to:
Posts (Atom)