For those of you who are on Facebook, there is now a V&O Historical Society group. Donald Dunn, who is the creator of the Kentucky, Virginian & Ohio free-lanced railroad, created the page after a visit to the current version of the V&O on Gerry's Albers incredible Deepwater District of the Virginian.
If you are on FB, check out the group. There are some great shots of all three versions of the V&O along with numerous photos of locos and rolling stock. Given the depth and breadth of Allen McClelland's modeling efforts over the years, I'm sure this page will grow quickly with a lot of wonderful memories.
And thanks, Donald, for setting up the group.

Friday, April 28, 2017
Monday, April 10, 2017
Inspiration- Part 2
As mentioned in a previous post, I hit a wall with the porch railing on one of the two company houses that I'm building and they both went back into the box. See this post for the details: http://cwerailroad.blogspot.com/2017/03/inspiration-part-1.html. A week or so later, I walked back into the railroad room and looked at the porch railings on several company houses that I had previously built- see the photo below.

There was the inspiration! A quick check of Tony Koester's book on modeling coal railroads confirmed that the same type of railing was used on a house similar to the white one I'm modeling. And the photo contained the detail I needed for my railing.


There was the inspiration! A quick check of Tony Koester's book on modeling coal railroads confirmed that the same type of railing was used on a house similar to the white one I'm modeling. And the photo contained the detail I needed for my railing.
Armed with a new plan, I headed back to the workshop. The railing for the green house appears to made out of 2' x 4's in between 4' x 4' posts for the porch railing. I began by cutting the 4' x 4' posts to size. Next, I cut the vertical pieces of 2' x 4' using a scale rule and attached two of them to the 4' x 4' posts, making sure to leave enough room at the bottom for the 2' x 4' piece that would span the 4' x 4' posts. So far, so good. Then I glued the vertical 2' x 4's to the bottom 2' x '4 at intervals between the posts. It quickly became evident that, despite my careful measuring, the vertical 2' x 4's were slightly different lengths. Placing the top piece of railing over them really showed how off they were. Sigh. The whole mess went into the garbage can.
It took me a couple of days to come up with a new plan. I have always been a big fan of jigs when scratch-building structures, and it seemed a jig of some sort might be the answer for my problems with these railings. But the real key was figuring out how to get multiple pieces cut to the exact length. While I have several different versions of Northwest Shortline's Chopper, these small pieces of styrene are just too fine for that tool. So I cut a number of pieces of 2' x 4' slightly longer than the required measurement, placed them next to one another on a piece of glass, and then butted them up to a straight edge. Using a scale rule to determine the correct length, I cut them all at once. Bingo! A bunch of vertical 2' x 4's that were all exactly the same length- see the photo below.

Next, I taped a straight edge to the piece of glass that I was working with in order to hold the railing pieces in place while I assembled them. The photo below shows how I added the horizontal pieces to the side railings for the white house. With the front portion next to the side section, I could make sure that the two ends would match up on the 4 x 4 post.

The photo below shows the completed porches ready for painting. Once the base colors have been applied, I'll come back and weather them before attaching them to the structures.

Now it's on to the roofs.
Saturday, April 1, 2017
Panel Progress
Since the last op session in early March, two more panels have been replaced. The panel at Nelsonville took a little longer than some of the others as it has two repeater signals on it. The photo below shows the new setup.
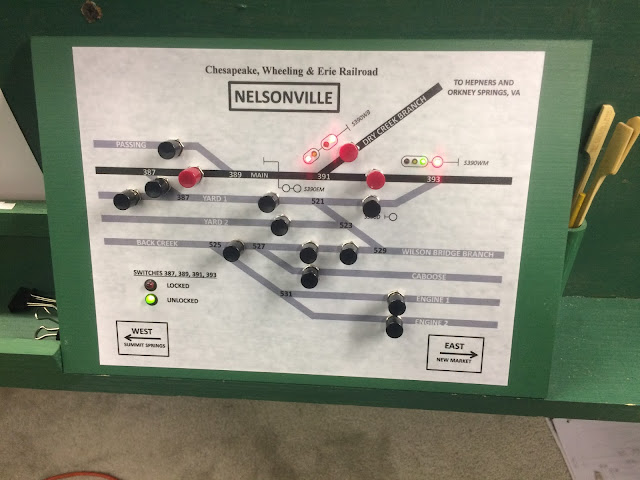


The two repeaters are for the signals facing away from the camera in the photo below. The front of these signals cannot be seen by an operator in the aisle.

The second panel to be replaced is the one at East Yard. It's shown in the photo below.

The engine terminal tracks have now been separated into four power blocks. On the old terminal, there were just two blocks- one for both tracks on the left and one for both tracks on the right. I also took this opportunity to clean up some of the wiring behind the scenes.
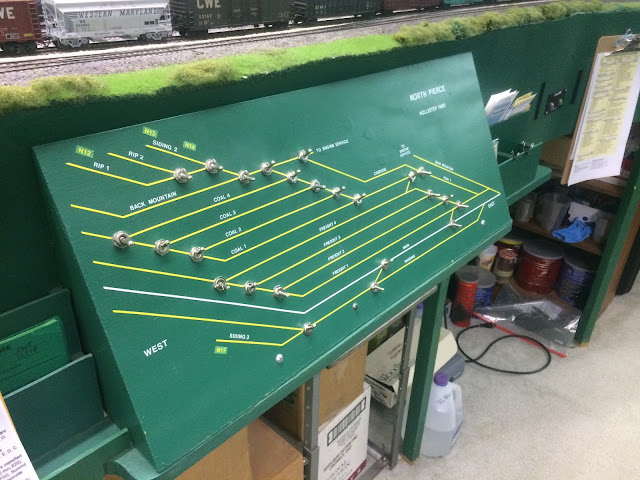
To date, ten of the old panels have been replaced with the new, route selection pushbutton controls. There are only three more left- but one will be a major project. The photo below shows the main panel for Hollister Yard in North Pierce.

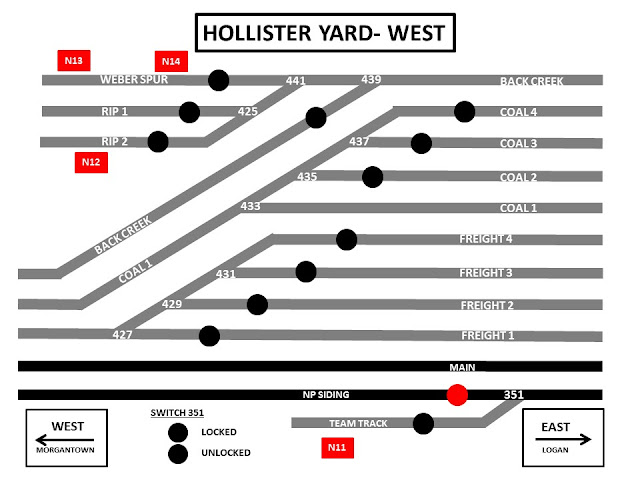
Hooking up the RCS cards won't be that much of a challenge, but providing power routing for all of the turnouts will take some time. Changing this panel will also allow me to cut down on the size. The new panel will actually be two 8" x 12" panels and will look like this.


The smaller panels will allow me to cut the shelf back to the same width as on either side of the main panel. This will create a little more room in the aisle here. The crews have also suggested that moving the panels to the ends of the shelf and placing the car card boxes between may make it a little easier when working the yard.
But next up will be the panel at the engine terminal in North Pierce. The photo below shows the current panel. The controller for the turntable was an add-on- and it certainly looks it.

The new design will simplify the overall appearance and cut down on the size. I should be able to move the engine card boxes from the front of the fascia to the shelf with the panel. The diagram below shows a draft of the new panel. It will include four separate power districts like the current panel, and like the new one at East Yard.

The three red buttons at the bottom right will be used for the turntable controller. A rotary switch will be located in the center of the turntable and will be used for roundhouse track selection. I'm using the PTC III controller made by New York Railway Supply.
Along with replacing these panels, there are a handful of signals left to build. Once all of this is complete, it will time to start on the CTC board. And as I've said before, that's been the goal all along.
Subscribe to:
Posts (Atom)